Data security policies
Prerequisite – Please note to work through this lab you will need to have Admin rights to the system and have basic AOT navigation skills.
Microsoft have introduced an alternative to the ‘Record level security’ used in AX 2009 which caused huge performance issues. This alternative is known as ‘XDS’ (Extensible Data Security).
The concept is extremely simple and it doesn’t take long to setup a XDS query of your own. In this blog I will start by explaining the ‘concept’ behind XDS after which I will run through a simple lab.
Note – Microsoft have have made extensive notes on this feature. Please find the links at the bottom of this page.
Concept
“XDS limits a specific Role to only see a specific set of data within an AX table”
Above I’ve attempted to summaries in one line the primary function of XDS. In essence the XDS security policy will apply a permanent filter onto a specific table within AX. To understand this better I will work through a simple business requirement.
Company A have two manufacturing sites (Site 1 and 2) they require the Production managers (Worker Z, Worker Y and Worker X) to see specific sets of data.
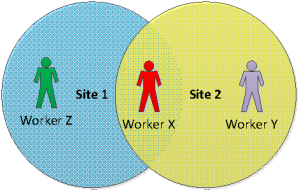
Above we are attempting to
display that the share the same AX security roles (the ability to
access the same forms and preform the same tasks) however they should
only be able to see the data from their respective sites.
Requirement gathering for XDS
The first step in setting up an XDS policy is simply identify the table you would like to apply a filter too, the field you are filtering on and the variants of this filer. So working through this for the scenario above you would end up with:
Constrained table – The constrained table act as the table you desire the filter to appear upon (Note – There can be multiple constrained tables as long as the primary table and the filtered field can been seen in that constrained table).
Primary table – The primary table can typically be defined as the field used to filter the constrained table.
In order to identify which tables meet the above definitions navigate to the table you desire to filter upon and identify the appropriate table relationships. Below I have worked through the example of filtering the production order table down by site. This should help you to apply the same logic to your desired business scenario.
Prior to setting up the XDS policy you will also need to create a new Role within AX. This will generate less maintenance than applying the XDS directly to an existing security role. If you were to apply the XDS security policy directly to the production manager security role you would need to then create two production security roles and therefore maintain two production manager security roles rather than the one security role with an additional XDS role on top of that. Instead I would suggest that you create three new security roles one called ‘XDS_Site_1’, ‘XDS_Site_1_2’ and ‘XDS_Site_2’.
To do this follow these steps:
In this next section we will run through the steps you would need to take in order to create the XDS policy.
To recap on out original requirements we had 3 users Z, Y and X with the following requirements:
To achieve the requirements of Z and Y you would need to create two
policies as we did in the example above. However, it should be noted
that you CANNOT STACK XDS policies by this I mean if you wanted
user X to see sites 1 and 2 but not site 3 you should not apply both two
policies created above as they will cancel each other out and you will
end up with no data displaying you would need to create a new policy
with a query such as =”1”,”2” in a new XDS security role.
The final outcome should be as follows:
Prerequisite – Please note to work through this lab you will need to have Admin rights to the system and have basic AOT navigation skills.
Microsoft have introduced an alternative to the ‘Record level security’ used in AX 2009 which caused huge performance issues. This alternative is known as ‘XDS’ (Extensible Data Security).
The concept is extremely simple and it doesn’t take long to setup a XDS query of your own. In this blog I will start by explaining the ‘concept’ behind XDS after which I will run through a simple lab.
Note – Microsoft have have made extensive notes on this feature. Please find the links at the bottom of this page.
Concept
“XDS limits a specific Role to only see a specific set of data within an AX table”
Above I’ve attempted to summaries in one line the primary function of XDS. In essence the XDS security policy will apply a permanent filter onto a specific table within AX. To understand this better I will work through a simple business requirement.
Company A have two manufacturing sites (Site 1 and 2) they require the Production managers (Worker Z, Worker Y and Worker X) to see specific sets of data.

|
Worker
|
Site 1
|
Site 2
|
|
Z
|
Yes
|
|
|
Y
|
|
Yes
|
|
X
|
Yes
|
Yes
|
Requirement gathering for XDS
The first step in setting up an XDS policy is simply identify the table you would like to apply a filter too, the field you are filtering on and the variants of this filer. So working through this for the scenario above you would end up with:
- Table to be filtered? Production order table
- Field you would like to filter on? Site
- Variants required? 1 and 2
Constrained table – The constrained table act as the table you desire the filter to appear upon (Note – There can be multiple constrained tables as long as the primary table and the filtered field can been seen in that constrained table).
Primary table – The primary table can typically be defined as the field used to filter the constrained table.
In order to identify which tables meet the above definitions navigate to the table you desire to filter upon and identify the appropriate table relationships. Below I have worked through the example of filtering the production order table down by site. This should help you to apply the same logic to your desired business scenario.
- Open Production control > Common > Production orders > All Production orders.
- Make sure you have the field site displayed to do this click View > Dimensions
- Select site and save the changes
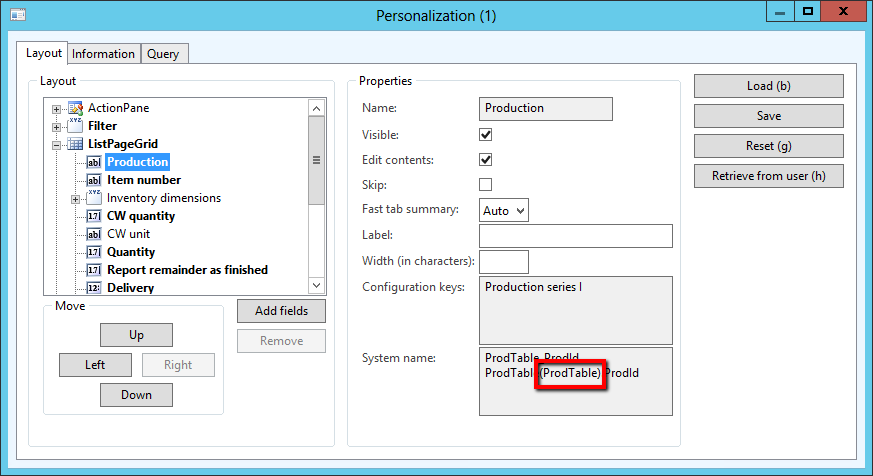
- Firstly we will identify the Constrained table, right click on the field ‘Production order number’ and click ‘Personalize’ in the menu
- Within the Personalization screen identify the table used (this can be seen in the screen shot below)

- Next we will need to identify the primary table and field. In our case the field ‘Site’
- Right click the field ‘Site’ and select ‘Personalize’
- Within the Personalization screen identify the table and field used (this can be seen in the screen shot below)
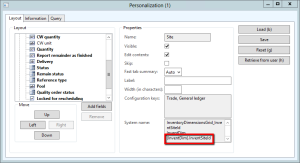
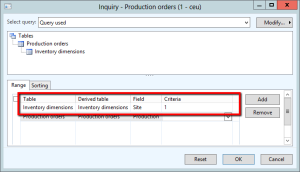
- This information has been summarised below:
Primary tableFiltered fieldApplier filterConstrained tableXDS – Production orders – Site 1InventDimInventSiteID=”1″ProdTableXDS – Production orders – Site 2InventDimInventSiteID=”2″ProdTable - If you can create an advance query to represent your desired outcome
you will also be able to create this using XDS. Also it will help you
understand how the relationships work.


Prior to setting up the XDS policy you will also need to create a new Role within AX. This will generate less maintenance than applying the XDS directly to an existing security role. If you were to apply the XDS security policy directly to the production manager security role you would need to then create two production security roles and therefore maintain two production manager security roles rather than the one security role with an additional XDS role on top of that. Instead I would suggest that you create three new security roles one called ‘XDS_Site_1’, ‘XDS_Site_1_2’ and ‘XDS_Site_2’.
To do this follow these steps:
- Open the AOT (Ctrl+D)
- Navigate to Security > Roles
- Right click on the ‘Roles’ node and select New Role
- Name the roles appropriately (remember to change the name and the label)
In this next section we will run through the steps you would need to take in order to create the XDS policy.
- The first thing you will need to do when creating an XDS policy will be to create a project within the AOT. This will help to keep your work together and simplifies the deployment of code too.
- Open the AOT (Ctrl + D)
- Open the projects screen (Ctrl+Shift+P)
- Right click the ‘Shared’ folder and select New > Project
- Select an appropriate name for the project (XDS_PRODUCTION_ORDERS_SITE_1)
- Right click and Open the project
- Right click you project and click New > Query
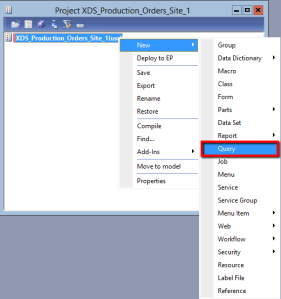
- I find it helpful at this point to also name the query to do right click the query and select ‘Rename’ (XDS_InventDim_SITE_1)
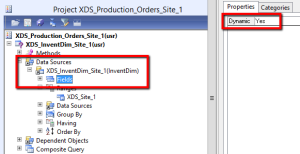
- Next we need to define the primary table
- Expand the query and right click the ‘Data source’ and select New Data Source
- This will create a new node called ‘INVALID TABLE_#’
- Selecting this node should bring up a properties plane on the right hand side of the development screen
- In the properties screen first select an appropriate name and then specify the table you would liking this node should bring up a properties plane on the right hand side of the development screen
- In the properties screen first select an appropriate name and then specify the table you would like to filter on.

- We have now selected the primary table but we still need to define the ‘Range’ (Criteria) for the filter.
- Expand the data source you created and right click on the ‘Ranges’ node and select New Range.

- Again using the Properties screen amend the following fields:


|
Name
|
XDS_Site_1
|
|
Field
|
InventSiteId
|
|
Value
|
=”1”
|
- Next select the field’s node and again in the properties amend the property ‘Dynamic’ to ‘Yes’.

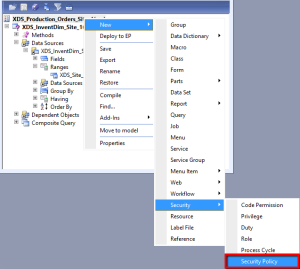
- Right click the main project ‘XDS_Production_Orders_Site_1’ and then click New > Security > Security Policy
- Select the ‘SecurityPolicy1’ node and modify the properties to be:

|
Property
|
Value
|
|
Name
|
XDS_Production_Site_1
|
|
Label
|
Restrict Production orders to site 1
|
|
PrimaryTable
|
InventDim
|
|
Query
|
XDS_InventDim_Site_1
|
|
PolicyGroup
|
Production
|
|
ConstrainedTable
|
Yes
|
|
Enabled
|
Yes
|
|
Operation
|
All operations
|
|
Context Type
|
RoleName
|
|
Role Name
|
XDS_Site_1 (setup in step 14)
|
- Next we need to define the constrained table. Expand the security policy node to reveal the ‘Constrained table’ node right click this node and select New > Add table by relation
- Within the properties set the following values:
|
Property
|
Value
|
|
Constrained Table
|
Yes
|
|
Table
|
Prodtable
|
|
Table Relation
|
InventDim
|
- We have now setup out XDS policy. Remember to COMPLIE THE WHOLE PROJECT! To do this right click the project and click ‘Compile’ this should then remove the red line next the project. (If it doesn’t try closing the window and navigating to it again)
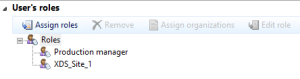
- Open System administration > Common > Users > Users
- Select the test user you would like to apply the policy too
- Select Assign roles and select the roles Production manager and XDS_Site_1
- Close your AX application and open again as a different user to do this hold down ‘Shift’ and right click the AX application and select ‘Run as different user’
- Navigate to the appropriate area and test that the filter has been applied.

To recap on out original requirements we had 3 users Z, Y and X with the following requirements:
|
Worker
|
Site 1
|
Site 2
|
|
Z
|
Yes
|
|
|
Y
|
|
Yes
|
|
X
|
Yes
|
Yes
|
The final outcome should be as follows:
|
|
AX ROLES
|
|||
|
Production manager
|
XDS_Site_1
|
XDS_Site_2
|
XDS_Site_3
|
|
|
Worker Z
|
Yes
|
Yes
|
||
|
Worker Y
|
Yes
|
Yes
|
||
|
Worker X
|
Yes
|
Yes
| ||
I really appreciate information shared above. It’s of great help.
ReplyDeleteMicrosoft Dynamics AX Online Training
Thank You! your sharing helps me much. The related AX2012 MS DOC is deprecated in 2024, I searched a lot and finally find you here.
ReplyDelete