Interview Questions

Wednesday, January 27, 2016

How to cancel deliver remainder in Ax 2012

To cancel PO deliver remainder, refer the following steps;
Create a new PO with quantity 10
Confirm PO
Post the packing slip with 8 quantity
To cancel the deliver remainder of 2 quantity, navigate to menu button General -> Line quantity -> Update Line -> Deliver remainder
Deliver remainder_2
In the deliver remainder form, you can mention the quantity which to be cancelled. In our case we assume 2. Click on ‘Cancel quantity’ button,
Update remaining qty
To confirm if pending quantity is successfully cancelled, navigate back to ‘Line quantity’ menu button and check ‘Deliver Remainder’ field;
Update deliver remainder
Deliver remainder field is blank i.e. no quantity is pending to deliver.
There is another way also to cancel deliver remainder.

How to cancel the Sales Order or a PO in Dynamics AX 2012 ?

In this scenario we will look at how to cancel a Sales Order or a PO. How the Sales Order or PO will get a status= Cancelled.

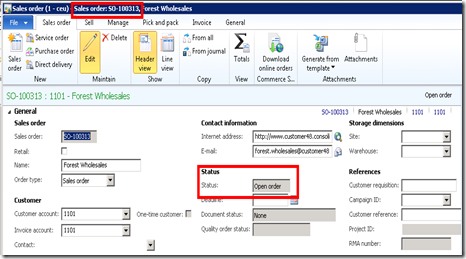
First create a new sales order and have one sales line for example.
image

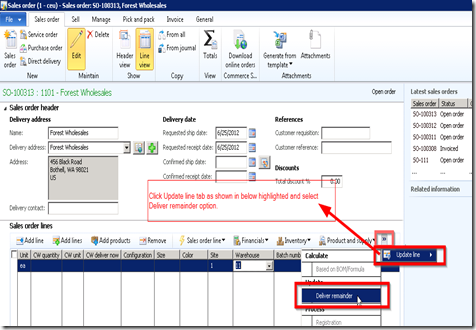
Go to Sales order –> select sales line—> click Update line as shown in the below screenshot—> select Deliver remainder
image

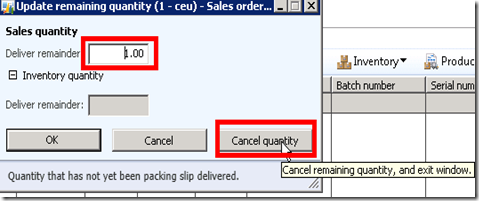
New Update remainging quantity form is opened—> Click Cancel quantity button as shown in below screenshot.
image

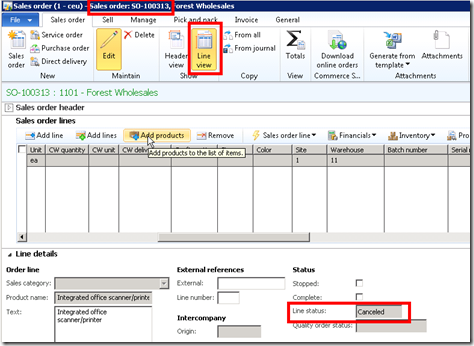
Once you perform this for a single line where no items has been delivered then automatically sales line status will be changed to Cancelled as shown in below screenshot.
image

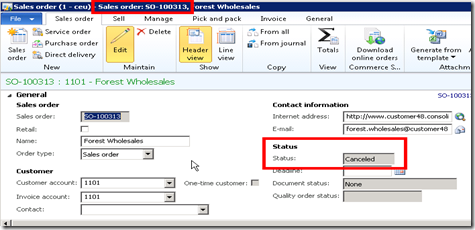
Once you perform this for all lines which are not processed (means no items were delivered from all the lines) then automatically sales order header status will be changed to Cancelled as shown in the screen shot below:
image

Friday, January 15, 2016

Quarantine management

Introduction

Hi! In this training lesson, we will study the Quarantine Management functionality in Microsoft Dynamics AX.
The quarantine management is used to manage items that must be quality controlled (quarantine items). For example, the Fans Company purchases fans and sells them. Customers often return a lot of fans because they don’t work. The Fans Company decides to check the purchased fans. As a result, the company creates a special place in the warehouse. All fans which arrive to the warehouse are transported to this place for quality control. The Quality Manager will randomly pick fans from each case and will check how they work. If a selected fan works, whole case is marked as checked. Then, the checked cases will be transported to the destination location.
Microsoft Dynamics AX uses a quarantine order to control quarantine items. Let’s check how this works in the application.

Create and Set Up an Item

We will work with this demo data. Let’s create the Fan item. We have already studied how to create an item in this training lesson, so you need to create an item with the following values:
  1. Item number = 101
  2. Item name = Fan
  3. Item group = Packaging
  4. Inventory model group = FRP_QUAR
  5. Dimension group = N-WLP
There are two groups attached to an item which affect whether an item can be used in quarantine management:
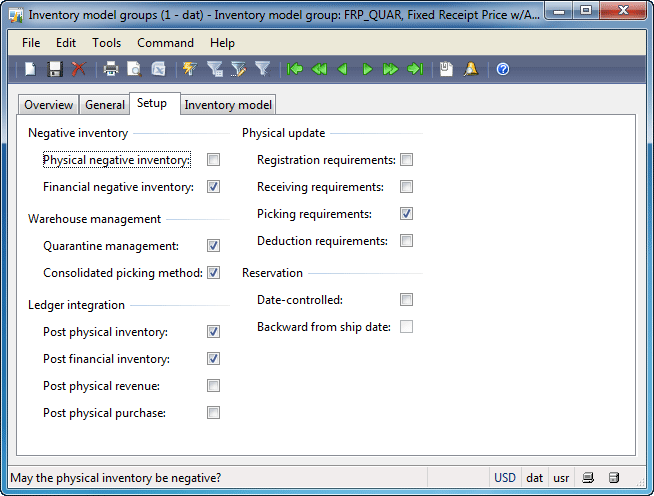
  1. Inventory model group. An inventory model group can be accessed from Inventory Management > Setup > Inventory > Inventory model groups. The Quarantine management check box on the Setup tab must be selected. We have set up the FRP_QUAR inventory model group for the Fan item, this group has the following setup:
    Inventory model groups form
    Inventory model groups form
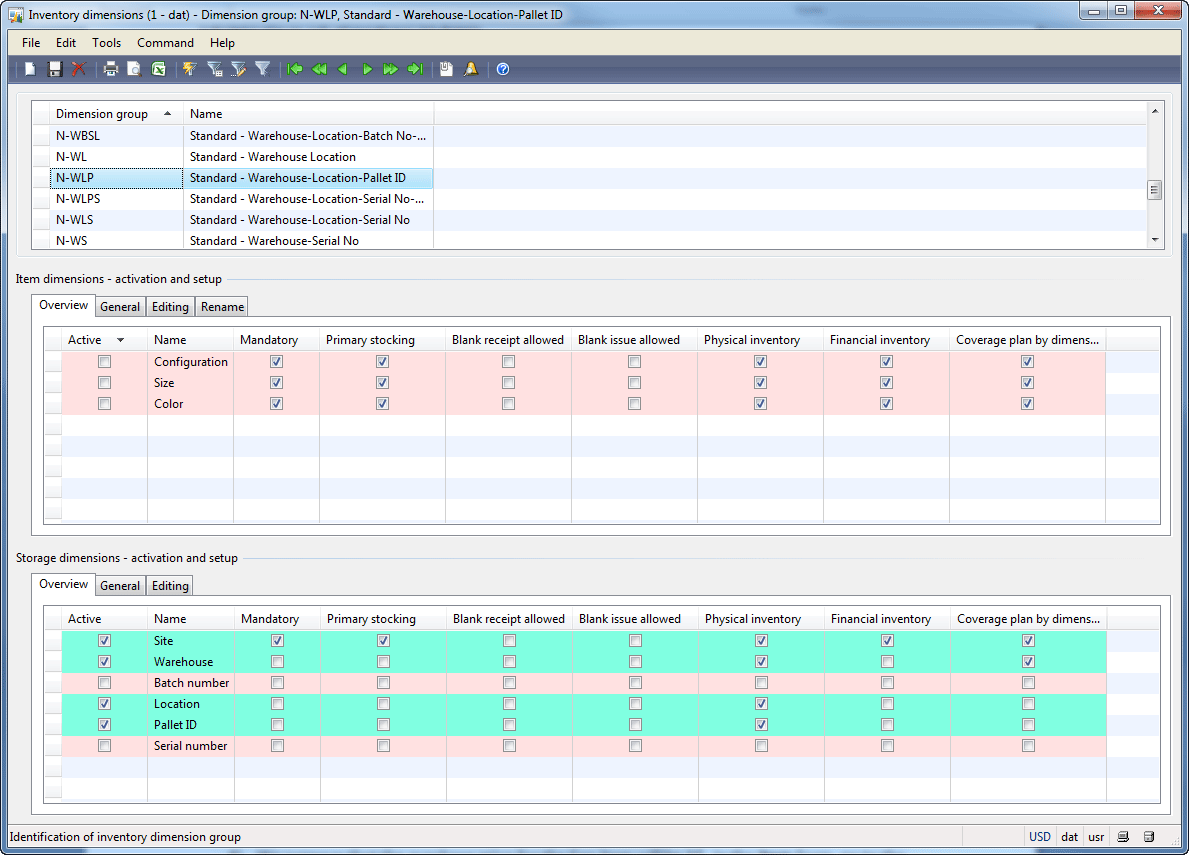
  2. Dimension group. This group determines what parameters are required to store an item. The minimum setup is Site and Warehouse. The Dimension groups form can be accessed from Inventory Management > Setup > Dimensions > Dimensions groups. We have set up the N-WLP dimension group for the Fan item, this group has the following setup:
    Inventory dimensions form
    Inventory dimensions form
Let’s set up additional parameters for the Fan item. We suppose that:
  1. The Fan item will be transported on the 42*42 pallet. In the Item form, go to the Setup tab > Warehouse management field group, and fill in 42″X42″ in the Pallet type field. Save the line (CTRL + S).
  2. The default pallet quantity is 12. In the Warehouse management field group, find the Pallet quantity field and fill in 12. Save the line.
  3. There will be three levels of items stored on the pallet, each level containing four pieces.. In the Warehouse management field group, find the Quantity per layer field and fill in 4. Save the line.
  4. We suppose that the purchase price for the Fan item will be 5$. In the item form, go to the Price/Discount tab > Base purchase price field group and fill in 5 in the Price field. Save the line.
  5. The default purchase order quantity will be 100. In the Item form, click the Setup > Default order setting menu button. The Default order settings form opens. On the Purchase order tab > Purchase quantity field group fill in 100 in the Standard order quantity field. Save the line.

Set Up a Warehouse

In introduction, we have mentioned about a special place in a warehouse where the item will be placed in order to verify its quality (a quarantine place). Let’s understand how we can set up quarantine places in Microsoft Dynamics AX.
If we go to the Locations form (Inventory Management > Setup > Inventory breakdown > Locations) and look through the location types we will not find the quarantine type. We can’t set up a separate location as a quarantine one. Microsoft Dynamics AX allows creating only a quarantine warehouse. So, if the company uses one warehouse for storing and controlling the quality of items, the space in the warehouse must be divided into two logical parts – a warehouse and a quarantine warehouse. A quarantine warehouse can have the same types of locations as the general warehouse has (i.e. bulk locations, picking locations, outbound and inbound docks).
Since the company can have several quarantine warehouses, each quarantine warehouse is assigned to a warehouse.
We assume that the Fan company receives fans to the  warehouse 22, and the identification of the quarantine warehouse is 28.
I use the demo data, so  the warehouse 22 already exists, let’s check its setup:
  1. Go to Inventory Management > Setup > Inventory breakdown > Warehouses. The Warehouses form opens.
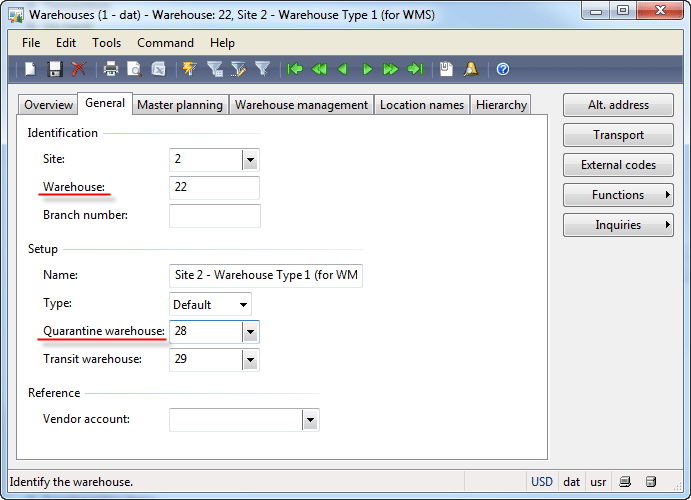
  2. Find the  warehouse 22 and go to the General tab. Make sure that the Quarantine warehouse field is filled in with the value 28.
Warehouses form
Warehouses form
If an item will be received to a warehouse that doesn’t have the quarantine warehouse set up and the item must be quarantine controlled, the receival process will be stopped and an error message will be shown.

Order Items

We assume that the Purchase Manager orders 100 Fans from the 1001 the Earth Televisions vendor.
Create a purchase order:
  1. Go to the Accounts Receivable > Common Forms > Purchase Order Details. The Purchase order form opens.
  2. Create a new line. The Create purchase order form opens. Select the 1001 vendor.
  3. In the lines area, create a new line with the following values:
    • Item number = 101
    • Site = 2
    • Warehouse = 22
  4. Save the line. Note that the Quantity field is automatically filled in with 100 and the Unit price field is filled in with the value 5.
We assume that the vendor packs the items and delivers them to the Fan company the same day. Check that the Delivery date field contains the current date (displayed in the lower part of the Purchase order form).
Let’s check the inventory transactions:
  1. Open the Items form and find the 101 item.
  2. Click the Transactions button. The Transactions on item form opens.
  3. Add the Location and Pallet dimension in the form: click the Inventory > Dimensions display button. In the Inventory dimensions form, select the Location and Pallet id check boxes and click OK. The Transactions on item form will have the following view:
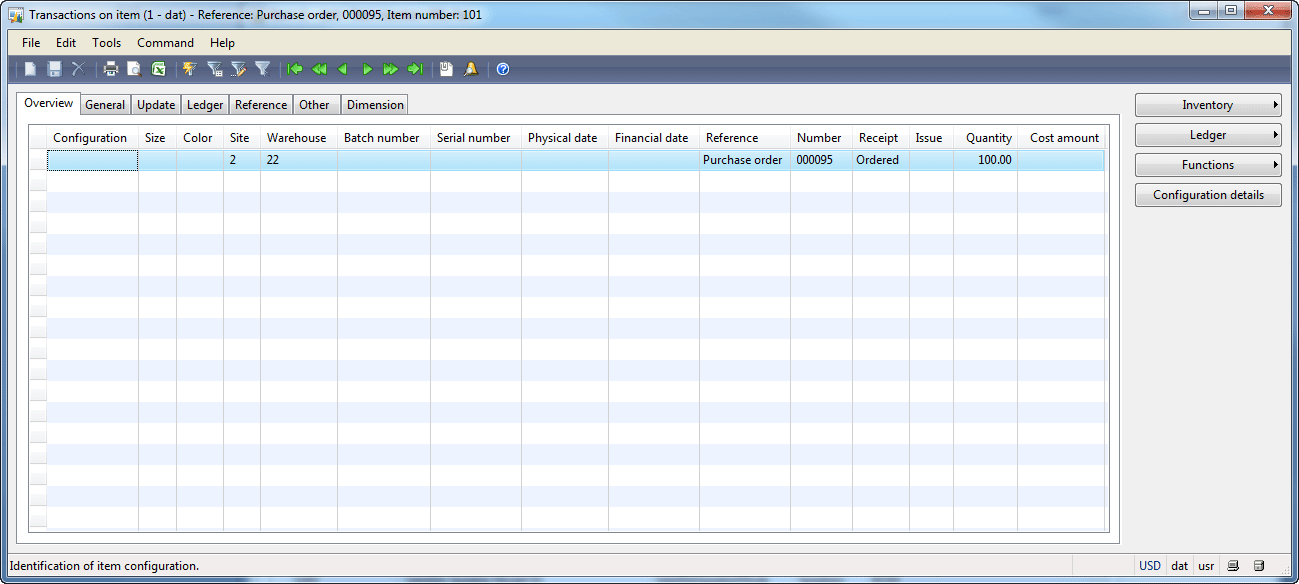
    Transactions on item form, Ordered
    Transactions on item form, Ordered

Item Arrival and Registration

For more information, see the Item arrival and registration training lesson.
When the truck with the Fan items arrives to the  warehouse 22, the Purchase Manager starts the arrival and registration process:
  1. Go to the Inventory Management > Periodic > Arrival overview. The Arrival overview form opens.
  2. Find the created purchase order and select the Select for arrival check box.
  3. Click the Start arrival button.
  4. The Infolog with the information about the created arrival journal ID will be shown.
  5. Click the Show button in the Infolog dialog box or go to Inventory Management > Journals > Item arrival > Item arrival. The Location journal form opens. Find the last journal.
  6. Click the Lines button in the Location journal form. The Journal lines form opens.
    Journal lines form
    Journal lines form
    We can see that one purchase order line with 100 fans is divided into 9 separate arrival journal lines with 12 fans. This is because we store items on pallets and the default pallet quantity for the Fan item is 12 (Item form > Setup tab > Warehouse management field group > Pallet quantity field). Each pallet will be transported to an individual place (location) in the warehouse. The items are received from the truck and placed onto pallets with the help of a Lumper. For more information, see the Purchase business process lesson.
  7. The Purchase Manager examines received pallets and generates pallet numbers for them. Pallet numbers are required because the Fan item uses the N-WLP inventory dimension group (i.e. when fan items are registered in the warehouse, they must be stored on pallets in a specific location). For each journal line, click the Functions > Pallet id menu button in the Journal lines form.
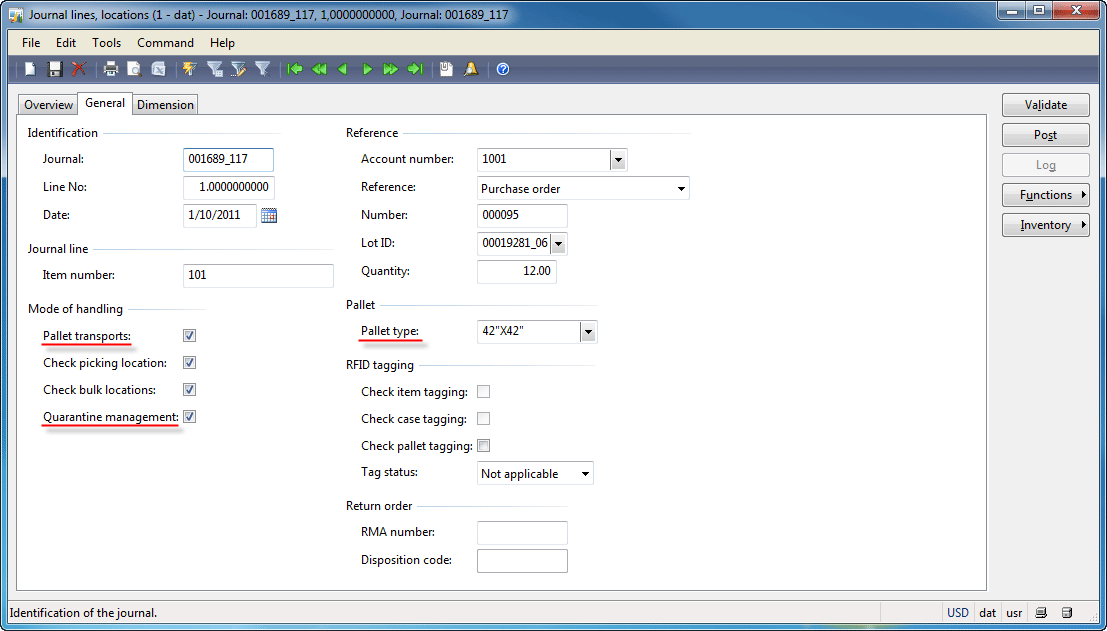
  8. Now, the Purchase Manager creates tasks for the forklift driver to transport pallets from an inbound dock to the destination location. A pallet transport task will be created during the posting process if the Pallet transport check box is selected for the journal line. In the Journal lines form go to the General tab > Mode of handling field group and make sure that the Pallet transport check box is selected for each journal line. The destination location will be searched during the posting process. The quarantine location will be searched only if the Quarantine management check box is selected for the journal line. In the Journal lines form, go to the General tab > Mode of handling field group and make sure that the Quarantine management check box is selected for each journal line. Note that the Pallet transport check box is selected by default if the item dimension group has the Pallet ID dimension active. Note that the Quarantine management check box is selected by default on the journal line if item inventory model group has the Quarantine management check box selected.
    Journal lines form, General tab
    Journal lines form, General tab
  9. The Purchase Manager clicks the Post button in the Journal lines form.
  10. The “Item 101, dimensions: Warehouse=28, has no picking location in warehouse 28” error message will appear.

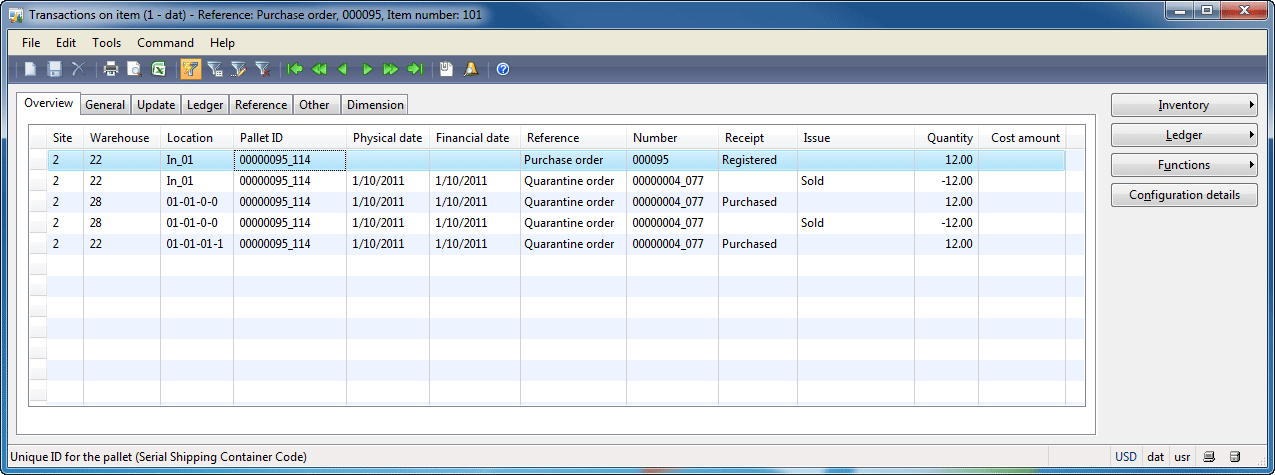
Let’s check inventory transactions. Open the Items form and find the 101 item. Click the Transactions button. The Transactions on item form opens. Filter the result for the 00000095_114 pallet. The Transactions on item form will have the following view:
Transactions on item form
We can see that
  • The pallet is sold (deducted financially) from the In_01 inbound location.
  • The pallet is sold (deducted financially) from the 01-01-0-0 quarantine location.
  • The pallet is purchased (received financially) to the 01-01-01-1 destination location.
Also, we can check the on-hand quantity for all mentioned locations:
  1. Go to Inventory Management > Setup > Inventory breakdown > Locations. The Locations form opens.
  2. Find the In_01 location (22 warehouse) and click the Inquiries > On-hand menu button. The empty On-hand form is shown.
  3. Find the 01-01-0-0 location and open the On-hand form. The empty On-hand form is shown.
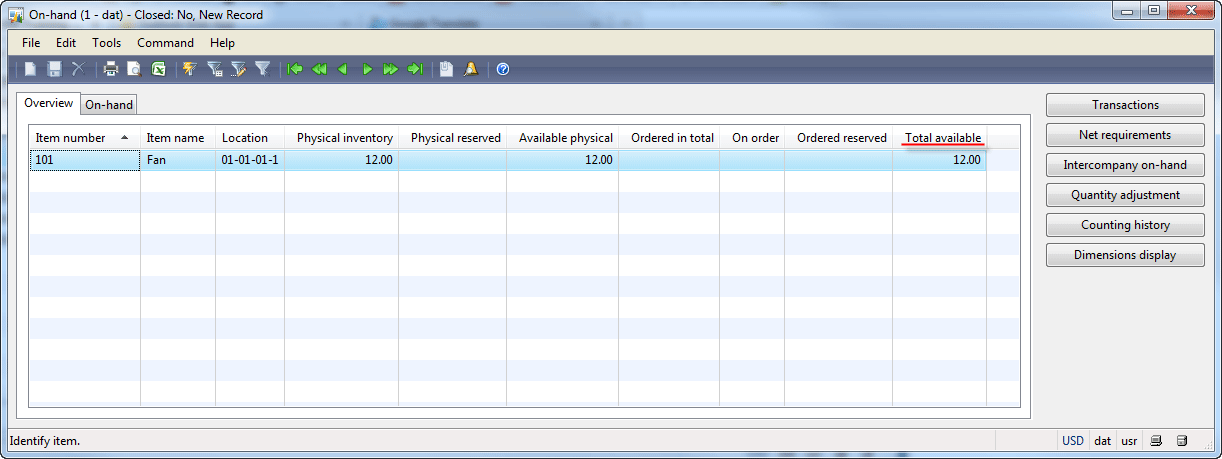
  4. Find the 01-01-01-1 location. Open the On-hand form. The following form is shown:
    On-hand form
    On-hand form

Inventory blocking

Overview

The possibility to prevent items currently in your warehouse from being used in standard processes has often been requested. In previous versions of Dynamics AX this was primarily possible with the quarantine order functionality. However quarantine orders require items to be (logically) moved to a separate quarantine warehouse.
So the new blocking functionality is designed to allow items to be blocked at their current location.
The first requirement is to be able to block some of the current on-hand. During the analysis for the new functionality it was discovered that in addition there is also a need to block some incoming goods until quality inspection is complete.
The second requirement is that the current on-hand is always correct – both from a quantity point of view and from a value point of view.

The ideas behind it all

For most types of issue transactions – like sales orders – it is possible to point out specific on hand and use the physical reservation to reserve/block current on-hand for the specified transaction. To ensure that items on-hand are blocked we create a set of issue transactions and use the same physical reservation mechanism. This set is identified by a unique InventTransId value.
To ensure that the expected on-hand is always correct we create a set of expected receipt transactions. The date when the items are expected to be released back to inventory can be modified by the user. This ensures that master planning can correctly considers items currently blocked.
The set of expected receipt transactions is identified by another unique InventTransId value.
We have defined a new reference type for the inventory transactions related to blocking called “Inventory blocking”.
This screen shot shows the transactions for a blocking entity where a single piece is being blocked
image
The corresponding on-hand form in a scenario where 1000 pieces are on hand is shown below
image
The inventory blocking functionality intentionally doesn’t have any scrap functionality – or other means of deducting some of the blocked on-hand. If you want to allow for such functionality you need to combine the blocking functionality with other processes for issuing items.
As the inventory blocking functionality never consumes or moves any on-hand there is no need to ever pick, pack or invoice any of the issue transactions (which would also require updating of the receipt transactions). When the items are no longer to be blocked the quantity is simply reduced or the entire blocking entity is deleted along with all the transactions associated.

Manual inventory blocking

Manual inventory blocking – as opposed to quality order blocking – is the process where a user directly creates a new inventory blocking entity and specifies quantity and inventory dimensions.
The form for maintaining inventory blockings can be found in the “Periodic” section under “Inventory and warehouse management”.
When saving the new inventory blocking entity inventory transactions are automatically created which makes the physical reservation and represent the release back to inventory.

Quality order blocking

A quality order can be created either manually or automatically as part of the receipts process. For both cases an inventory blocking entity is automatically created – just as for a manual inventory blocking entity. However as the received items may be part of a linked chain (marked) of transactions the blocking transactions are inserted into this chain upon creation and the original chain is recreated again upon release from blocking.

Monday, January 11, 2016

Cases: Product Change

A new type of case became available in Ax 2012 R2 CU7. The Product change case!!
It sure smells like a mini ECO (Engineering Change Order); hopefully this is the first stirring of a grand enhancement that includes revision control. Where is this new functionality hiding? In many places!
1 .Product change case for the product

When in Products, you suddenly see new tab called “Engineer”. (there used to be no tabs here)

2. Product change case for the released product
When in Released products¸ Case icons have been added to the existing Engineering tab

3. Product change case for the BOM

You can create a Product change case from the BOM-header.
4. Product change case for the BOM-line

A little different here: for the BOM-line I can only associate an item with a case!

5. Product change case for the Routing

6. Product change case for the routing operation

This is not any different then number 5. The Association in the Case is with “route”, not “route operation”.
PS. It is not possible to link a case to a Production order.
This is on our wish list, as well as the option to link a case to a Sales Quotation and certainly to a Project Quotation.

The “Create Case” icon is not lit up?
The License configuration in System Administration / set up:

The “product change cases” has to be checked!
Now it is still very possible that the ‘Create case’ is still grayed out! And the reason is: your category tree, a mandatory feature that is used to classify a case, does NOT yet contain a branch for “product change”.
You have to put that in yourself.
Let’s check!
Organization administration/setup/Cases


In the bottom we see the notorious “product change” category which has a series of hard coded validation rules that you can enable. They are warnings or show stoppers or just info.
A Product change case that is created for a Released product has one part number it is associated with. This is called the “primary” association. Manually you can assign other part numbers, the result will look like this

Items are listed twice because they exist as product and as released product. You can remove the product references, but there is no parameter to switch off this behavior.
 
There are new associations possible with the product change case: Product, BOM/Formula, Route and.. Item!
The unique features of the Product Change category
There are hard coded features tied to this category.
The Activities fast tab controls creation of activities.
The Validation rules will be checked when the case reaches its last phase.
The user can only change the ‘error level’ of an enabled validation rule, or the user can disable the rule altogether.

Product Change Case PROCESS STEPS


Lesson learned: when I have a Product change case for a BOM, the “check completeness” will yell at me until I have created associations for the released product = item. (look for “item” in the list!)
PECULIAR DETAIL: the “item” association is the released product and I cannot create it from the case. I can only go to the Released product and “associate it” with the existing case. The result will look like this

The product association can be left out. But the “item” association is critical.


When “check completeness” shows no errors, the “Approve” etc. can be checked.
You will see the screen below. The possible actions are shown.


In the associations fast tab, only when the association is with an item, you can click on the ‘where-used analysis” to get the screen above. You have to “RUN” the analysis before the tree will appear.
One can associate all the higher level items and BOM’s found with the case.
This would include routes. It is not common to include routings in engineering change notices or ECO. It depends on the industry.

The result can look like this

Explanation: every evaluation rule is indeed “evaluated”.
As soon as a case is “in process” the icons ‘Check completeness” and “Approve and activate changes” lit up.

NOTE: The “Change status” is the hard coded status of a case. The “Change stage” is a user defined set of stages that represent the “case process”. This is an optional thing. At the moment the case is created, a case process can be selected under the other tab.

Sunday, January 10, 2016

catch weight items [AX 2012]

The dimension configuration and weight that you set up for a catch weight product determines whether the item uses full or partial visibility.
  • Catch weight items that use full visibility require that the inventory quantity is known for each catch weight unit. For example, assume shrimps are sold in boxes and the customer requires that each box must have a unique identification and a known weight. In this example, the item number for the boxes of shrimps should be created as a catch weight item that uses full visibility. You create catch weight items that use full visibility if you assign a unique serial number to each catch weight unit.
  • Catch weight items that use partial visibility require that the inventory quantity is known for batches of items that use a catch weight unit. For example, assume that a company receives a batch of 100 boxes of shrimps with a nominal weight of 10 kilograms. Because all of the boxes belong to the same batch, they all use the same batch number. As each box can vary in weight, the whole batch of boxes is weighed. The number of boxes and their total weight can be registered in a single transaction.

    To set up a catch weight item, be familiar with these setup guidelines:
    • When the item is created in the New released product form, the catch weight, the CW product check box, must be selected to designate the item as catch weight. You select this check box on the Product tab of the form.
    • You must set up a conversion between the inventory unit and catch weight unit. Set the conversion up as an inter-class conversion.
    • You set up the catch weight unit on the item master and define the minimum and maximum quantities in inventory units that are allowed for the item.
    • You cannot set up an item as catch weight if the item has existing inventory transactions or is associated with a batch or serial number group that has a per quantity defined.
    • You cannot set up a catch weight item for a product type of Service or production types of BOM or Planning item.
    • To designate a catch weight item as full visibility, you must specify a tracking dimension group for the item where the Serial number dimension is set to active with Serial number control.

      When you reserve inventory for a catch weight item that uses full visibility and the physically reserved or on-hand quantity is a value of 1, all of the inventory is reserved to the order. For example, assume for a sales order that the CW physical reserved quantity is 1 with a Physical reserved quantity of 20. If the actual Physical inventory value for this item dimension is 21, all of the inventory quantity (21) is reserved to the order.


Translation of product dimension values added to Dynamics AX 2012 R3

In Dynamics AX 6.3 we added the possibility to translate product dimension values. For example, colors for a product can now be translated. The maintenance of dimension values across products has also been improved. This blog post will describe the details of these improvements.
Part I: Translation of product dimension values
Adding Translations
When you have defined a product master, the product dimensions must be added on the Product dimensions form. The Translations button becomes available on the Product dimensions form.
ProductDimensions
As a standard in AX the Translations button opens a form where languages can be added and names and descriptions in the new languages can be defined.
Translations
The ID of the dimension values are still used to select the dimension values. For the example illustrated above you would see Green and not Neon green in the drop-down on for example a sales order line.
When you have defined the dimension values, the variants have to be defined in the Product variants form. Once that is done there is a new step, Generate descriptions, that will place the translated dimension value for Name in the description of the variants. Note, that Generate descriptions will overwrite any existing description.
 In case there are more than one dimension, the description will contain the relevant values from all the dimensions. For example, the color named Ocean blue and the size named Medium will be combined and the description will be Ocean blue Medium.
ProductVariants
The descriptions are created in all the languages for which there are translated dimension values. In case there is no translation defined for a specific dimension value, the generated description will first try to use the system language value and then the ID.
Open Translations from the Product variants form to see the descriptions for other languages than the system language.
DescriptionTranslations
Viewing the translations
On order lines, the variant description is a part of the Text field. The Text field is used on related documents such as packing slips and invoices, and this makes the translated values visible on those documents.
SalesQuotation
The language set on the order header determines the language of the description that is placed in the Text fields on the order lines.
SalesQuotationHeader
Part II: Maintaining product dimension values across products
In Dynamics AX 2012, product dimension values are defined per product. This allows the maximum flexibility when selecting which values the product dimensions can have for a given product. However this also implies that values cannot be reused across products.
In Dynamics AX 2012 R3, we have addressed the maintenance issue by taking the Variant group feature from the Retail area and made it generally available. Like before, dimension values are defined per product, but the Variant group allows dimension values to be defined once and then get pushed to a group of products. We also added translations of dimension values to the variant group feature.
For example, a set of colors can be defined and maintained in one place, including translations. The set of colors can then be used for, for example, a summer collection of apparel.
The flow when using the variant group feature is as follows:
  1. Define the variant groups for the product dimensions you plan to use.
  2. When you add new product masters, you select the relevant variant groups from step 1 and then all the dimension values from the selected variant groups are added to the product master.
  3. Add or change the dimension values for the variant groups to fit your needs. The changes are immediately available for the product masters. Note, that if product variants exist for a dimension value, you must delete the variants before you can delete the dimension value.
  4. Update variant descriptions in one step when you have created the dimension values´ translations for a variant group.
Define variant groups
Variant groups is a new menu under Product information management/Setup. Variant groups are defined separately for each of the product dimensions. If Retail is installed, Variant groups can also be found under Retail/Setup.
ColorGroups
When a new variant group is created, you can click a button like Colors to open a form that allows you to define the dimension values. In the screen shot below two colors have been defined.
ColorGroupLines
Clicking Translations opens a separate form that allows translations for the colors in the group to be defined. Note that in this form you can edit translations for all dimension values in the variant group.
VGroupTranslations
Add products to the variant group
When new product masters are defined, you can select the variant groups. Note, that variant groups can only be selected for the product dimensions that are defined in the product dimension group. In the example only color is available.
ProductDetails
Once you have selected the variant group, the product dimensions from the variant group are available on the product master.
ProductDimensionsVariantGroup
Add or modify dimension values in variant groups
When dimension values are changed ...
ColorGroupLinesChanged
...the changes are immediately transferred to the products associated with the variant group:
ProductDimensionsChanged
Deleting dimension values from variant groups
Note, that if any of the existing variants use a dimension value such as a Green KidsTShirt, an error occurs if you try to delete that dimension value from the variant group. The variants must be deleted before you delete the dimension value.

InfologWarning
Generate variants automatically
There is an option on the product masters to generate variants automatically. The variant groups support this, so if you select the option, variants are created for all the dimension values in the variant group.
Note, that you must select Generate variants automatically and save the product master (Ctrl S) before you select the variant group.
When this setup is completed, new variants are created when you add dimension values to the variant group.

ProductDetailsAutoGeneration
Updating product variant descriptions by variant group
The variants of product masters that use variant groups can have their variant descriptions updated when the variant group is changed.
Click Generate variant descriptions to update all variants for products in the variant group.
GenerateVariantDescriptions
An extended example
To illustrate the features above, consider a summer collection of apparel.
The collection consists of several T-shirts that come in different colors and sizes.
The colors for the collection are specific to the collection so a new color variant group has been defined with the colors.
Size variant groups for adults and children, respectively, already exist with the relevant values.
The specific T-shirts in the apparel are defined in AX as product masters. All combinations are expected to be used so Generate variants automatically is selected. The new variant group for colors and the relevant size variant group (adult or child sizes) are selected.
To add an additional color, the color variant group is opened and the new color is added. Variants with the new color is added for all sizes and products that use the color variant group.
To add translations, click Translations. The name of the color in the new language is added. Then click Generate variant descriptions. The variant descriptions for all variants are updated to include descriptions with the new name in the new language .
So all relevant product masters can be updated from one form. We expect this to simplify the creation and maintenance of product variants.