Agenda
- Introduction
- How to post an Invoice
- Sales Taxes
- Commissions
- Post an invoice
- Summary
Introduction
Hi, in this training lesson, we will finalize the work with the sales order. The last step in the sales order processing is posting and printing a Sales order invoice.We go through the main steps of the process, understand sales order financial posting, and analyze the results (include the shipping carrier charges).
The Sales Manager posts an Invoice to record in the system that the items are sold. During this process, an Invoice document is printed. The Invoice document is a guarantee that the items are sold to the Customer and the Customer must pay for them during a certain period. This document is sent via a fax or an e-mail to the Customer for sign.
The results of the invoice posting process are as follows:
- The Invoice document is printed.
- General ledger transactions are generated: inventory account is decreased, cost of goods sold is increased, Customer account is increased, Sales account is decreased.
- Inventory transactions issue status is changed from Deducted to Sold
How to post an Invoice
The Sales Manager performs the following actions:- Open the Sales order form and find an appropriate sales order.
- Click the Posting > Invoice menu button. The Posting invoice form opens.

Posting invoice form - The Sales Manager verifies the line quantities and prices.
- Select the Print invoice check box.
- Click the OK button (don’t do this right now).
Sales Taxes
Sales taxes of different kinds are applied in every country. Sales taxes have a lot of types (see here ). Each country (even a district) has a lot of different taxes; see for example sales taxes in the United States.To set up a Sales tax for the Sales order, the Sales Manager takes the following steps:
- Open the Sales order form.
- Find an appropriate sales order.
- In the lines area, go to the Setup tab.
- Under the Sales tax field group, fill in the Item sales tax group and Sales tax group fields.
The Sales tax code contains the rules on how the tax will be included into an invoice.
Sales tax codes are set up under General ledger > Setup > Sales tax > Sales tax codes.

Sales tax codes form
To set up 8.25%, click the Values button in the Sales tax codes form. In the Values form, enter 8.25 in the Value field. Close the form.
As you understand, each sales tax code belongs to the Settlement period which is set up under General ledger > Setup > Sales tax > Sales tax settlement periods.

Sales tax settlement periods form
Authorities are created and set up under General ledger > Setup > Sales tax > Sales tax authorities.

Authority form
In other words, the Authority is vendor. Our company buys nothing from this vendor and pays money =).
The AV_CAST sales tax code will be paid to the CAA authority which is 7001 Vendor.
When the invoice is posted, the vendor transaction is created.
Also, the general ledger transaction is created. Each sales tax code belongs to the ledger posting group (General ledger > Setup > Sales tax > Sales tax codes form > Overview tab > Ledger posting group field). This group contains the information about general ledger accounts that will be used for different types of sales tax during invoice posting.
Let’s find out what general ledger account will be used for tracking the authority (vendor) transactions:
- Go to General ledger > Setup > Sales tax > Ledger posting groups. The Account group form opens.
- Find the CAST ledger posting group (the AV_CAST sales tax code belongs to it).

Account group form - The Sales tax payable field contains the general ledger account that will be used during invoice posting.
We already know that in the sales order lines, only the sales tax group and the item sales tax group are set up. So, we should find or create a sales tax group that contains the AV_CAST sales tax code and find or create an item sales tax group that contains the AV_CAST sales tax code.
Sales tax groups are set up under General ledger > Setup > Sales tax > Sales tax groups. The Sales tax groups form already contains the CA (California) sales tax group. Click the Setup tab to make sure that the AV_CAST sales tax code belongs to this group.

Sales tax groups form
We have discussed earlier that sales tax codes included into both groups (sales tax and item sales tax) are applied to the sales order line. So, the Item sales tax group must exclude the HR_CAST and SP_CAST sales tax codes and include the AV_CAST sales tax code.
The item sales tax group is set up under General ledger > Setup > Sales tax > Item sales tax groups.
We don’t need to create new item sales tax groups, because our demo data already contains a relevant item sales tax group. This is the AU/VI item sales tax group. Let’s check that the AV_CAST sales tax code belongs to this group and HR_CAST and SP_CAST do not belong. In the Item sales tax groups form, go to the Setup tab.

Item sales tax groups form
Good. Now, let’s set up the CA sales tax group and the AU/VI item sales tax group in the sales order line:
- Open the Sale order form. Find an appropriate sales order.
- In the sales order line area, go to the Setup tab.
- Fill in AU/VI in the Item sales tax group field.
- Fill in CA in the Sales tax group field.
- Save the line. The “Delivery date control is disregarded because the receipt date 6/10/2010 is before today” message will be shown. Ignore it.
We can now check the sales tax amount:
In the header of the Sales order form, click the Setup > Sales tax menu button.
The Temporary sales tax transactions form shows.

Temporary sales tax transactions form
In our case, the Sales Manager sets up the item sales tax group and sales tax group manually. In real life, they are filled in by default.
Item sales tax group is set up per item under the following path Inventory management > Common Forms > Item Details > References tab > Sales order field group > Item sales tax group field.
Sales tax group is set up per customer under Accounts receivable > Common Forms > Customer Details > Setup tab > Sales tax field group > Sales tax group field.
Commissions
Let’s assume that the Sales Manager must receive a 10% commission for each sale.The Sales Manager has an employee account. An employee account is set up per Microsoft Dynamics AX User under Administration > Common Forms > Users > User relations button > General tab > Internal user field group > Employee field.
So, when you log on to Microsoft Dynamics AX, the system finds your employee account.
Link your User to employee account 7210 by following the steps:
- Go to Administration > Common Forms > Users.
- Find you account in the Users form (You can get the information about you account under Administration > Common Forms > Online users).
- Click the User relations button. The User relations form opens.
- Go to the General tab.
- Fill in 7210 in the Employee field.

User relations form - Close the form.
To open the Commission calculation form, go to Accounts receivable > Setup > Commission > Commission calculation.

Commission calculation form
We can see that the commission is set up only per a commission item group, because the item code = Group for all lines.
Find the commission group that the Bottle item belongs to:
- Go to Inventory management > Common Forms > Item details. The Item form opens.
- Find the Bottle item.
- Go to the General tab > Groups field group > Commission group field.
Create a new commission calculation:
- Create a new line in the Commission calculation form.
- Select Table in the Item code field.
- Fill in 1 (Bottle) in the Item relation code field.
- Setup Customer:
- If we want the Sales Manager to receive commission when invoicing any customer, select All in the Customer code field.
- It is possible to set up specific customer commission group. In this case, select Group in the Customer code field. The Customer commission group is created under Accounts receivable > Setup > Commission > Customer groups for commission. A Customer is assigned to a Customer commission group under Accounts receivable > Common Forms > Customer details > Sales order tab > Sales order field group > Commission customer group field.
- It is possible to set up specific Customer. In this case, select Table in the Customer code field.
- Select Table in the Customer code field.
- Fill in 1000 (Natural Juice) in the Customer relation field.
- Perform settings for the Sales Manager:
- If we want all Sales Managers to receive commission when invoicing the Natural Juice Customer buying the Bottle item, we must select All in the Sales rep. code field.
- If only a certain sales team must receive commission, we must select Group in the Sales rep. code field and fill in the necessary group in the Sales rep. relation field. The Sales team belongs to the sales commission group. The sales commission group is set up under Accounts receivable > Setup > Commission > Sales groups. (The Commission sales group form opens.) We can assign a new Sales Manager to the sales team in the Commission sales group form > Sales rep. button > create new record. Or under Basic > Common Forms > Employee details > Commission menu button > Sales groups button> create new record. If the Sales Manager belongs to the sales team, the commission is received by each member of the team as it is divided between all members according to the percent parameter. The percent is set up in the Sales rep. form (click the Sales rep. button in the form).
Only two choices are available (All sales managers or sales team). We assume that only the sales team that our Sales manager belongs to must receive the commission. So let’s find the Sales commission group that includes employee 7210:
Sales rep. form
- Go to Basic > Common Forms > Employee details. The Employee form opens.
- Find the employee account that is associated with our User ID (It is employee account 7210).
- Click the Commission > Sales groups menu button. The Commission shares form opens.
We can see that the Sales Manager belongs to sales teams 20 and 30. The Sales Manager receives 45% of all commission earned by sales team 20 and 20% of that earned by sales team 30.
Commission shares form
Let’s assume that the Sales Managers included into sales commission group 20 can receive commission. - Select Group in the Sales rep. code field.
- Fill in 20 in the Sales rep. relation field.
- Fill in 10 in the Origin field. Note: all sales team will receive 10% commission; our Sales manager will receive 45% of this commission (4.5%). So, it is less that we assume.
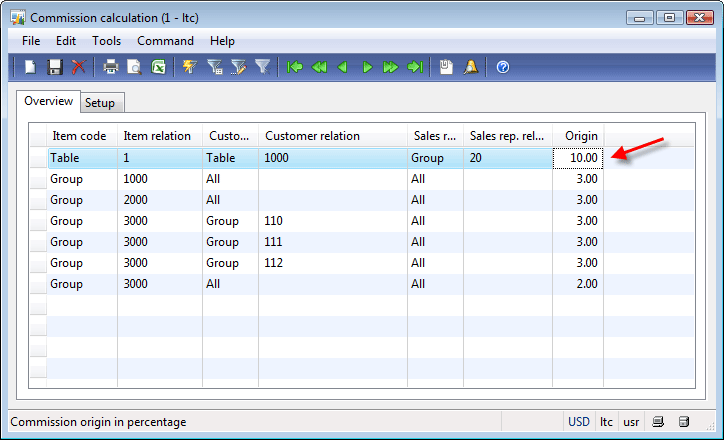
Commission calculation form
During posting of an Invoice, the commission amount will be recorded to special general ledger accounts.
The Commission posting form is used to link General ledger accounts to a commission transaction. When a sales order is invoice-updated, the commission amount on the posted sales line is:
- Debited to the Commission account.
- Credited to the Commission offset account.

Commission posting form
We can’t see the commission amount on the sales order until we post an invoice.
If we want the commission to be taken into account during invoice posting, we must set up a commission sales group on the sales order line (in the line area of the Sales order form, go to the Setup tab and fill in the Sales group field group with 20. Make the same setup for the second line. (When we save the line, the “Delivery date control is disregarded because the receipt date 6/10/2010 is before today” message appears; just close it).
Post an Invoice
The Sales Manager sets up sales taxes and commission, reviews the charges for the carrier. Now, it is time to post the Invoice.The Sales Manager goes to the Sales order form, finds an appropriate sales order, and clicks the Posting > Invoice menu button. The Posting invoice form opens. The Sales Manager selects Packing slip in the Quantity field of the Parameter field group. Go to the Lines tab and make sure that the quantities and other parameters are correct. Select the Print invoice check box. And finally, he or she clicks the OK button.
The result of the posting process is as follows:
- The Invoice document is printed.
In the Invoice document, we can find the information about the invoice total amount (12,875), sales tax amount (940.50), and carrier charges included in the misc. charges (535). The Invoice total amount is calculated as item price + misc charges + sales tax, i.e. 12,875 = 11,400 + 535 + 940.50.

Invoice document
Check the sales tax. In this training lesson, we have set up 8.25 % sales tax. The sales price is 11,400, so the sales tax is 11,400 * 0.0825 = 940.50. Good, it is just like in the invoice.
Check the carrier charges. Remember that in the previous training, we set up the following charges – core charges = 400, handling charges = 30, fuel surcharge = 270, and ancillary charges = 105. The total charge amount is 400 + 30 + 270 + 105 = 805. In the Invoice document, the misc. charges value is 535. Why is there such difference (805 – 535 = 270)? That is because we have forgotten to select the Charge fuel surcharge check box in the Sales order form (Sales order form > Header area > Delivery tab > Carrier information field group > Charge fuel surcharge check box). So, the fuel surcharge is not included in the Invoice total amount.
Commission amount is not printed in the Invoice document. - Issue status on inventory transactions is changed from Deduct to Sold. To check this, in the lines area of the Sales order form, click the Inventory > Transactions menu button. The Transactions
form opens.
Transactions form. Sold status. - General ledger transactions are generated. Let’s check the general
ledger transactions that are created during posting of an invoice
document. All information about the invoice can be viewed under Sales order form > Header area > Inquiry button > Invoice menu button. The Invoice journal form opens.
Before we check the general ledger transactions, let’s recall the sales tax, carrier charges, and commission amounts.

Invoice journal form
To find the posted sales tax amount, click the Posted sales tax button in the Invoice journal form. The Sales tax transactions form opens.
The total posted sales tax amount is 940.50.
Sales tax transactions form
To find the carrier charges included into the invoice, click the Misc. charges button in the Invoice journal form. The Misc. charges transactions form opens.
The total carrier charge is 400 + 105 + 30 = 535.
Misc. charges transactions form
To find the commission amount, click the Commission > Commission transactions menu button. The Commission transactions form opens.
Since the commission is received by the sales team, we can see that our Sales Manager (employee account 7210) will receive the 405$ commission for selling Bottle items and the 108$ commission for selling the Can items. The total commission amount is (10% * 11,400) / 100% = 1,140. (If we sum all employee commissions, we receive the same amount – 1,140).
Commission transactions form
So, again (all amounts are in one place):
- Total invoice amount is 12,875.50.
- Sales tax is 940.50.
- Carrier charges amount is 535 (Core charges = 400, Ancillary charges = 105, Handling charges = 30).
- Commission is 1,140.
- Items sales price is 11,400.
Analyze the voucher transactions (i.e. general ledger transactions):
Voucher transactions form
- Total invoice amount is 12,875.50. This amount is recorded to
account 130100. So, this account is used to track Customers’ balances
(the amount of money that must be paid to our Company from customers).
This general ledger account is taken from the default posting profile that is set up in the Account receivable parameters form located under Accounts receivable > Setup > Parameters > Ledger and sales tax tab > Posting field group > Posting profile field. Our demo data contains GEN in the Posting profile field. To find the posting profile setup, go to Accounts receivable > Setup > Posting profiles > find GEN posting profile > Setup tab.The Natural Juice customer belongs to customer group 20 (Major Customers). So, only the last record is right one for our Customer. The summary account for this record is 130100.
Customer posting profile form - Sales tax is 940.50. This amount is recorded to general ledger account 220110. So this account is used to track the Authority balance (the amount of money that must be paid to the Authority). The 220110 account is taken from the ledger posting group that is set up on the sales tax codes. We have already studied how a general ledger account is set up for the sales tax in the Sales taxes chapter of this training lesson.
- Carrier charge is 535. In the previous training lesson, we analyzed
that the carrier charges are taken from the Customer and stored in
special general ledger accounts. This is set up in the Misc. charges code form located under Accounts receivable > Setup > Misc. charges > Misc. charges code > Posting tab > Credit account field.
In our demo data, for the Core or Freight charges, general ledger
account 403500 is used, for the Handling charges, it is the 403150
general ledger account, for the Ancillary charges, it is also the 403500
general ledger account.
So, in the Voucher transactions form, we can see that 400 + 105 = 505$ is recorded to account 403500, and 30 is recorded to account 403150. - Commission is 1,140$. This amount is recorded to accounts 211500 and 602140. Account 211500 is used to track commission (the amount of money that must be paid to sales persons). Since the commission is included into the invoice amount, we must record that the commission is an expense (net profit must exclude the commission). This amount is recorded to account 602140. These general ledger accounts are taken from the Commission posting form located under Accounts receivable > Setup > Commission > Commission posting. We have already studied how general ledger accounts are set up for the commission in the Commissions chapter of this training lesson.
- Item sales price (or revenue) is 11,400. This amount is recorded to
account 401190. So, this account is used to track the revenue (the
amount of money that must be paid for sales items).
This general ledger account is taken from the item group. The Bottle and Can items belong to the Packaging item group.
Go to Inventory management > Setup > Item groups. The Item group form opens.
Go to the Sales order tab.
The Revenue field contains the general ledger account that will be used to track the revenue amount. We can see that this field contains general ledger account 401190.
Item group form - Inventory transaction. Inventory transaction is also reflected in
the general ledger accounts. When the items are sold, the cost amount
must be excluded from inventory value and included as cost of goods
sold. Remember that in this training lesson,
we set up the Bottle item cost to be 5 and the Can item cost to be 7.
So, the total cost amount is 1000*5 + 200*7 = 6,400$. This amount is
recorded to accounts 510190, 142300, 141050, and 130300.
Account 510190 is used to track the cost of goods sold. Account
141050 is used to track the inventory value (cost of items in the
warehouse). These accounts are set up in the Item group form > Sales order tab > Invoice field group > Issue and Consumption fields (see the previous picture).
When we post the packing slip, general ledger transactions are generated for accounts 142300 and 130300. Find these transactions in this training lesson (the “Voucher transactions form, Packing slip transactions” image). During posting of an invoice, these general ledger transactions must be reversed. - Penny difference. Sometimes it happens that the amount in the
general ledger account and the amount in the offset account(s) are not
equal because of rounding. If we sum all general ledger amounts, we must
receive zero. Because nothing disappears but only changes its form. In
our case, if we sum all amounts in the secondary currency (the Amount secondary currency
fields), we receive -0.01. So, Microsoft Dynamics AX generates
additional general ledger transactions for amount 0.01. This amount is
recorded to account 999999. This general ledger account is set up under General ledger > Setup > Posting > System accounts.

System accounts form
Summary
In this session we have done the following:- Set up sales tax.
- Set up commission.
- Post an invoice.
- Analyze results of invoice posting process (invoice document, inventory transactions, and general ledger transactions).
The following issues have been covered during the Trade and logistics training:
- How to create an Item
- What an item group, an inventory model group, and an inventory dimension group are
- Purchase business process
- How to create a Vendor
- Warehouses, aisles, racks, shelves, bins, store zones, store areas, and locations
- Forklifts and pallet types
- How to create a Purchase order
- Item arrival and registration process in Microsoft Dynamics AX
- Print management system
- Purchase order posting: Packing slip and Invoice
- Sales business process
- How to create a Sales order
- Available to promise
- Shipment process in Microsoft Dynamics AX
- Shipping carrier interface
- Miscellaneous charges, sales tax, and commissions
- Sales order posting: Packing slip and Invoice
- Serial and batch numbers
- Quarantine management
- Vendor returns
- Customer returns
- Over/Under Delivery
- Customer and Vendor Trade Agreements
- Request For Quote
- Purchase Requisitions
- Sales Quotation
- Quality Management
- Transfer Orders
- Inventory Journals
- Inventory Reporting and Statistics


