Interview Questions

Sunday, September 27, 2015

Set up and maintain procurement category hierarchies [AX 2012]

Use a procurement category hierarchy to classify products that your organization purchases for its own use. You can set policies for ordering from categories in the hierarchy, create attributes for categories, and assign vendors as preferred suppliers in a procurement category. Only one active procurement category hierarchy can be defined for an organization. 

  1. Click Product information management > Setup > Categories > Category hierarchies. On the Action Pane, in the New group, click Category hierarchy.
  2. In the Create a category hierarchy form, enter a name and an optional description of the procurement category hierarchy, and then click Create.
  3. In the Category hierarchy form, create a new category hierarchy. For more information about how to set up a category hierarchy.
  4. Assign the category hierarchy to the Procurement category hierarchy type. For more information about category hierarchy types.
After you create a category hierarchy, you can assign category attributes, commodity codes, category pages, and project categories to the parent category and subcategories. 

Use this procedure to assign product attributes to categories. All products in a category have the same product attributes. When you assign products to the category, you set up the values for product attributes. Product attributes are displayed in the Employee services portal in Enterprise Portal for Microsoft Dynamics AX.
For example, you assign the product attributes Installation and Warranty to a category. You set up the product attributes as Required. You assign the product Computer to the category, and set the value for both Installation and Warranty to Yes. When an employee orders a computer from the category, the employee sees that installation and warranty are included in the price of the laptop. For more information about product attributes.
  1. Click Procurement and sourcing > Setup > Categories > Procurement categories.
  2. In the Procurement categories: %1 form, select a category in the left pane, and then on the Product attributes FastTab, click Add.
  3. In the Product attributes form, select the product attributes that you want to associate with the selected procurement category. Click Select ->, and then click OK.
  4. On the Product attributes FastTab, select the characteristics for each product attribute. Select from the following options:
    • Required – Select this check box to require a value for the product attribute for products that you assign to the category.
    • Internal – Select this check box to specify whether the product attribute is displayed in Enterprise Portal.
    • Searchable – Select this check box to include the product attribute in searches for product attributes in Enterprise Portal.
  5. If the selected category is a subcategory, select the Inherit attributes from parent category: check box to assign the same product attributes to the subcategory that you assign to its parent category.

Use this procedure to assign products to categories.
  1. Click Procurement and sourcing > Setup > Categories > Procurement categories.
  2. In the Procurement categories: %1 form, select a category in the left pane, and then on the Products FastTab, click Add.
  3. In the Add products form, select the products that you want to assign to the selected procurement category, click Select ->, and then click OK.

Use this procedure to add a vendor to a procurement category and to specify whether a vendor is preferred in the category. When you delete a vendor from a category, the historical transactions with the vendor in the category are not deleted.
In the Employee services portal in Enterprise Portal, an employee can request to add a new vendor to a procurement category and to extend existing vendors to additional procurement categories. For more information about category requests.
  1. Click Procurement and sourcing > Setup > Categories > Procurement categories.
  2. In the Procurement categories: %1 form, select a category in the left pane, and then on the Vendors FastTab, click Add.
  3. In the Add vendors form, select the vendors that you want to assign to the procurement category, click Select ->, and then click OK.
  4. To delete a selected vendor from the category, on the Vendors FastTab, click Remove.
  5. Click Evaluation to open the Rating on vendor evaluation criteria form, where you can rate a vendor’s performance in the selected category.
    NoteNote
    Before you can evaluate a vendor, you must create vendor evaluation criterion groups and criteria, and then assign an evaluation criterion group to the category. For more information about how to set up and rate a vendor.
  6. In the Vendor status field, select a status. By default, the vendor status is set to Approved. You can change the vendor status to Preferred, and then set up a policy rule to require employees to order only from preferred vendors.
  7. Select the Inherit vendors from parent category: check box to assign the same vendors to the selected subcategory that you assign to its parent category. The approved or preferred status of a vendor is also inherited.

Use this procedure to assign a questionnaire to a procurement category. You can use questionnaires to understand a new vendor’s business and products, and to determine the vendor’s ability to provide products in a procurement category. When a vendor requests to do business in a procurement category, you can require the vendor to complete a questionnaire for that category.
  1. Click Procurement and sourcing > Setup > Categories > Procurement categories.
  2. In the Procurement categories: %1 form, select a category in the left pane, and then on the Questionnaires FastTab, click Add.
  3. In the Add questionnaire form, select the questionnaire that you want to associate with the selected procurement category, click Select ->, and then click OK. The activity type describes the intent of the questionnaire.
  4. To delete a questionnaire from a category, select the questionnaire, and then click Remove.

Use this procedure to enter values for category attributes. You assign category attributes when you create a procurement category hierarchy in the Category hierarchy form.
For example, you assign the category attribute Category contact to a category in the Procurement categories: %1 form. In the Category hierarchy form, you enter the name of the person to contact for questions about the procurement category. The name of the person is the value for the category attribute Category contact.
  1. Click Procurement and sourcing > Setup > Categories > Procurement categories.
  2. In the Procurement categories: %1 form, select a category in the left pane.
  3. On the Category attribute values FastTab, select a category attribute. In the General section on the right side of the FastTab, in the Value: field, enter a value for the category attribute for the type indicated. Examples of value types are Text, Currency, Boolean, Decimal, and Integer.
  4. To translate a value into another language, click the button on the right side of the Value: field.
  5. To clear a value from a category attribute, click Reset value.

Use this procedure to add a category page to a procurement category. You can create category pages in the Category hierarchy form. A category page contains information about the procurement category. Examples of this information include information about the type of products in a category, images of products in a category, and announcements such as sales or discounts that are available in a category. Category pages are displayed in the Employee services portal in Enterprise Portal.
  1. Click Procurement and sourcing > Setup > Categories > Procurement categories.
  2. In the Procurement categories: %1 form, select a category in the left pane.
  3. On the Category page FastTab, in the Category page: field, select the category page that you want to display in Enterprise Portal for the selected procurement category. The selected category page is displayed on the Category page FastTab so that you can review the page.
Restriciting the procurement categories to the employees using purchasing policies and organization Hierarchies

In general business scenario, it is a common requirement to restrict the employees of different departments to be able to raise the purchase requisitions for different set of items. AX2012 provides this functionality out of the box, which is possible by setting up the organization hierarchy and procurement policies in proper way.
In my previous post, a new procurement hierarchy has been created with two categories “Desktops” and “Laptops”. I am considering that hierarchy and going on.
Scenario:  An organization operates its business as Head office and regional office and it has Administration departments set in both the offices. The organization wants its Head office – Administration department employees to be restricted to raise the requisition for only the “Laptops category” whereas the regional office –administration department should be restricted to “Desktop computers” Category.
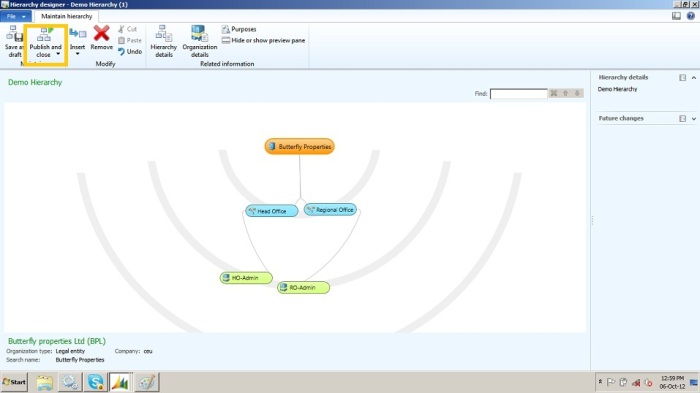
In the above case, let us create “Head office” and “Regional office” as Business units for the organization and “HO-Admin”, “RO-Admin” as the departments.
Create the Organization hierarchy “Demo Hierarchy” which looks like below and publish the hierarchy by clicking “publish and close” button as highlighted.(I am not explaining the creation of organization hierarchies as it is been discussed in some other blogs. You can refer to  Sandeep chaudhary’s blog  http://sandeepchaudhury.wordpress.com/2012/09/03/organization-modeling-made-easy-in-microsoft-dynamics-ax-2012/)

Important note: After creating the Hierarchy, assign the purpose “Procurement Internal control” to have the hierarchy reflected in the procurement policies.
Procurement policies setup:
To create new policy go to Procurement and sourcing>Setup> Policies> Purchasing policies> click new
Give the name as “HO-Admin policy” and click the parameters button and add the “Demo Hierarchy” to the order of precedence. By adding the hierarchy, we can set up the policies for any element(either business unit or department) in the hierarchy.
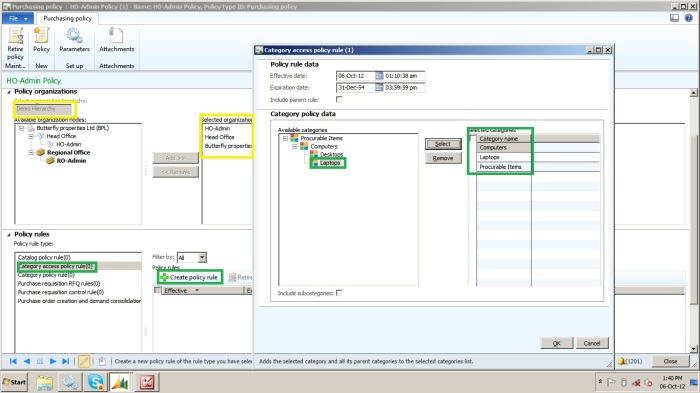
Expand the fast tab>Policy organizations> Select organization hierarchy as “Demo hierarchy” (refresh the form if you don’t see the created hierarchy) and add the legal entity node, business entity and department nodes to “Selected organization nodes”.
Let us define “Category access policy rule” under “policy rules” fast tab. Click “Create policy rule” to define the rule. Focus on the “Laptop Category” and click “Select” button to move them to the Selected Categories.

Now, for “HO-Admin” department, only the laptop category is applicable. If any user from this department create a purchaser requisition then, only the items under category “Laptops” can be seen and user can request only those items.
Let us check the end result by setting these dimensions to the employee.
Go to System administration>select your user id(the one which you are currently logged in with) click the button to see the employee you are linked to. (copy the same)

Goto HR> Employees form > filter the employee with the copied employee name>Edit
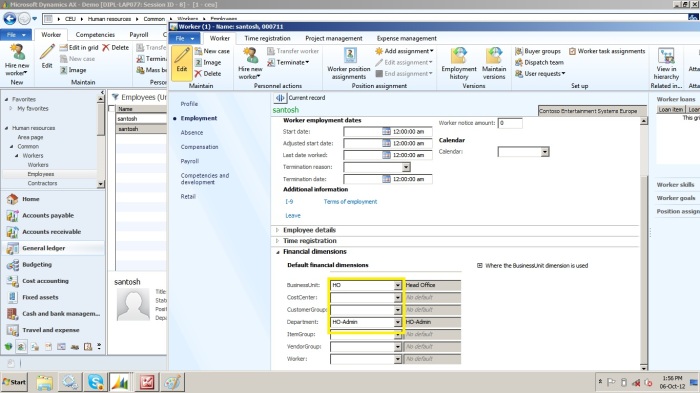
Click the Employment tab and specify the Business unit – HO, department – HO-Admin under Financial dimensions fast tabs.

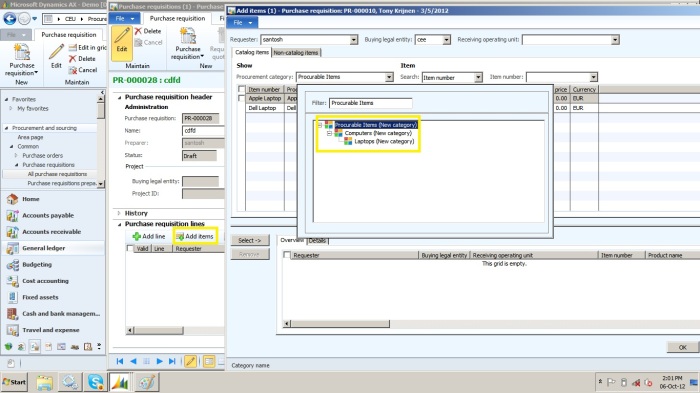
Go to Procurement and sourcing and open “All purchase requisitions” form to create a new purchase requisition. When a new PR is created, the current user’s linked employee will be considered as preparer. So, system will allow the items that are available in “Laptop category”.

You can see only the “Laptop category” available for the selection and “Desktop Category” will not be shown. Using organization hierarchy in a proper way we can set the purchasing policies as required by the organization.

Tuesday, September 22, 2015

Product Management in Dynamics Ax 2012 R3 (Product Master Creation)

product required one more step to finalize it before used in sales or purchase. 
  • Item group
  • Item module group.
  • Storage dimension.
  • Tracking dimension. 
For this purpose you have to go in Specific Legal entity and open the release product page.
12-10-2014 10-08-45 AM

When Release product form opens, select or highlight you required release product and click on Edit button.
select

You can find similar form.
Edit form
You find that there is validate button on Product tab, this button helps you to identify what is missing in finalizing the release product.

12-10-2014 10-15-11 AM
I clicked it for my newly released product.
12-9-2014 5-11-07 PM
It gives me warning that values for Item model group, Item group, storage Dimension groups and tracking dimension group values are missing.

Let’s first set the values for Storage and tracking dimension group.
For this purpose you have to click on top menu tab menu and click on Dimension groups
ddd


You can set values here for Storage Dimension group and Tracking Dimension group.
12-9-2014 5-16-14 PM
After setting dimensions go  to General fast tab you find the Item model group drop down, you have to set its value from there
12-9-2014 5-11-47 PM

For Item group please expend the Manage Costs fast tab and set its value from there.
12-9-2014 5-14-24 PM
After setting all these values click on Validate button to check that Release product is properly configured.

12-9-2014 5-18-03 PM

Free text invoice in Dynamics Ax 2012 R3

A common question arises in my mind that such a detail sales order invoiced exists then why we need free text invoice. I found two detail answers with reference
A free text invoice is an invoice that is not attached to a sales order. A free text invoice contains a header and one or more lines for items or services that are not tracked in inventory. Use a free text invoice for sales that do not require a sales order, packing slip, and customer invoice. For example, you can use a free text invoice for a consulting fee or services fee, or for a miscellaneous fee for an event reimbursement.
and
A free text invoice is not related to a sales order. It contains order lines that include ledger accounts, free-text descriptions, and a sales amount that you enter. You cannot enter an item number on this kind of invoice. You must enter the appropriate sales tax information.  Also, the customer balance is posted to the summary account from the posting profile that is used for the free text invoice.
In addition,  a free text invoice line can be used to sell a quantity of any kind of goods, services, or rights – providing unit price and quantity information to the customer. It also helps basic amount calculation, and it helps to better identify and explain charges to customers.
Now if we want to create a free text Invoice and post It. You have to follow this, Currently I am using
Contoso demo data and usmf legal entity.

Account receivable => common=> Free text Invoices => All free text Invoices

FreeTextMenu


Free Text Invoice List page opens

Free Text Invoice List Page

Click on Free text Invoice, following form will open
New Free Text Invoice Create Page
Select the customer
Select Customer
Add invoice lines. And select main account, Sales tax group and Item sales tax group. Update the Unit price.
Line
Now click on post on top menu
Post Menu
Following form will open
Postings

Click on ok button to post it, On successfully posting following form will open.
Posted result

Monday, September 21, 2015

Account number for transaction type Sales order revenue does not exist - AX 2012

Solution: If you've eliminated setup issues relating to the Item's configuration then the next step is to check for incomplete or missing configuration of the Chart of Accounts.
Navigate to: General Ledger > Setup > Chart of Accounts > Configure Account Structures and identify where the Sales Order Revenue Account is defined on this form. More likely than not, you will find that this GL account has not been included in any of the listed account structures. Note that this form is a new feature in AX2012 so it's possible that the configuration hasn't been completed.
What appears to be happening is that Dynamics AX2012 correctly identifies which Revenue Account to use for posting the Sales Invoice but cannot find an appropriate entry on the account structures form for this ledger account. In my opinion, the error message could do with being expanded so that users would be able to pin down the root cause.

Error message when you try to post a sales order invoice or a free text invoice in Microsoft Dynamics AX 4.0: "Account number for transaction type Sales tax does not exist"

Symptoms
When you try to post a sales order invoice or a free text invoice in Microsoft Dynamics AX 4.0, you receive the following error message:
Account number for transaction type Sales tax does not exist.
This problem occurs if the sales order invoice or the free text invoice contains sales tax.
Cause
This problem occurs if one or more of the following conditions are true:
  • No ledger account is specified in the Sales tax payable field of the ledger posting group that the invoice uses.
  • The Use tax setting of a sales tax code of a sales tax group is enabled. However, no ledger account is specified in the Use tax payable field of the ledger posting group that the invoice uses.
Resolution
To resolve this problem, follow these steps:
  1. Click General ledger, expand Setup, expand Sales tax, and then click Ledger posting groups.
  2. Specify a ledger account in the Sales tax payable field of the ledger posting group that the invoice uses. To do this, in the line of the ledger posting group, click the drop-down arrow in the Sales tax payable field, and then click a ledger account.
  3. If the Use tax setting of a sales tax code is enabled, specify a ledger account in the Use tax payable field of the ledger posting group. To do this, in the line of the ledger posting group, click the drop-down arrow in the Use tax payable field, and then click a ledger account.

Creating and starting a production order using X++ on Dynamics AX 2012

01
static void _CreateProductionOrder(Args _args)
02
{
03
    ProdQty         qty     = 100;
04
    ItemId          item    = 'youritemid';
05
 
06
    ProdTable       prodtable;
07
    InventTable     inventTable;
08
    InventDim       inventDim;
09
    ;
10
 
11
    // Initialize InventTable using the item
12
    inventTable = inventTable::find(youritemid);
13
 
14
    // Initialize the base values using the previous initialized inventtable.
15
    prodtable.initValue();
16
    prodtable.initFromInventTable(inventTable);
17
 
18
    prodtable.ItemId                = inventTable.ItemId;
19
    prodtable.DlvDate               = today();
20
    prodtable.QtySched              = qty;
21
    prodtable.RemainInventPhysical  = qty;
22
 
23
    // Initialize InventDim, using again the inventtable (Obrigatory)
24
    inventDim.initFromInventTable(inventTable);
25
 
26
    // Set the active BOM and Route, this in order to create the correspondind BOM lines and coproducts. Also to asign resources
27
    prodtable.BOMId = BOMVersion::findActive(prodtable.ItemId,
28
                                             prodtable.BOMDate,
29
                                             prodtable.QtySched,
30
                                             inventDim).BOMId;
31
 
32
    prodtable.RouteId = RouteVersion::findActive(prodtable.ItemId,
33
                                                 prodtable.BOMDate,
34
                                                 prodtable.QtySched,
35
                                                 inventDim).RouteId;
36
 
37
    // Initialize the BOMVersion
38
    prodtable.initBOMVersion();
39
    // Initialize RouteVersion
40
    prodtable.initRouteVersion();
41
 
42
    //Use ProdTableType class to create the production order
43
    prodtable.type().insert();
44
 
45
 
46
}


The code is fairly simple, it starts with the inventTable, and from there it searches for the BOM version and the route for the production order using the prodtable and the InventDim, with all set we just have to use the type().insert() method so the required InventTrans transactions are also created.
Next let’s see how to start the production order, this is fairly simple too, we will use the following code:
 X++ |  copy code |? 
1
void startProdOrder(args _args)
2
{
3
 ProdTable _prodTable;
4
 
5
 _prodTable = ProdTable::find(YOURPRODUCTIONORDER);
6
 _prodTable.autoUpdate(ProdStatus::StartedUp);
7
}
So first we initialize the production order, next we call the autoUpdate method, and we set the status we want, just take note that even if you can send any enum value as a parameter it won’t work if the order is beyond started.
Hope you like it!