Interview Questions

Wednesday, March 16, 2016

Price charges calculation in AX 2012

A price charge is an amount that is added to the unit price of the item. This charge is usually used to cover Overhead costs incurred by the item unlike Direct Material or Direct Labor costs which are covered by the unit price of the item. Examples of the overhead costs could be setup, packaging, bundling and freight costs. Before we proceed further, please note that the following 3 fields play their role when it comes to apply charges to an item:
1. Price charges
2. Price quantity
3. Incl. in unit price

For setting up selling price charges, please go to:
Product information management → Common → Released products → Edit a Released Product → Sell FastTab1
For setting up purchase price charges, please go to:
Product information management → Common → Released products → Edit a Released Product → Purchase FastTab1
Charges can be setup in two ways:

1. Fixed Charge

Fixed charge is treated as independent of the quantity of the item. Whether line item quantity is 1, 2 or 3 a fixed charge is added to the unit price of the item and is reflected in the net amount field. An example is illustrated below:
Price: 11.00
Price Charges: 13.00
Incl. in unit price: Unchecked
Therefore the price on the order line is calculated as:
Unit Price = Price + Price Charges = 11.00 + 13.00 = 24.00
Untitled

Untitled

2. Variable Charge

Variable charge depends on the quantity of the item sold/purchased. Checking “Incl. in unit price” defines the charge to be treated as variable. In this case the Price Charges are first divided by the Price Quantity and then added to the unit price of the item in the order line. An example is illustrated below:
Price: 11.00
Price Quanity: 2.00
Price Charges: 13.00
Incl. in unit price: Checked
Therefore the price on the order line is calculated as:
Unit Price = Price + (Price Charges/Price Quantity) = 11 + 13/2 = 17.50
In this way we can equally distribute the price charges among each of the item units ordered.
Untitled

Untitled


 NOTE: Any Trade Agreements that are setup for a vendor override the price/discount specifications on an item.
Sunday, March 13, 2016

Setup Ageing period definition


Setup Aging period definition


This article describes how to set up ageing period definition in Dynamics AX 2012.
You can use aging period definitions to analyze the maturity of customer accounts and vendor accounts, based on a date that you enter. Each ageing period that you set up for the ageing period definition corresponds to a column on the list page or in the form or report when the analysis is performed. In Accounts receivable, ageing period definitions are also used to define customer ageing snapshots (ageing indicator are used in the collection form and not in the report).
You can setup several ageing period definition, but each period definition can only have 6 columns

Ageing period definition set up

Access:
  • Accounts receivable > Setup > Collections > Ageing period definitions
  • Accounts payable > Setup > Statistics > Ageing period definition
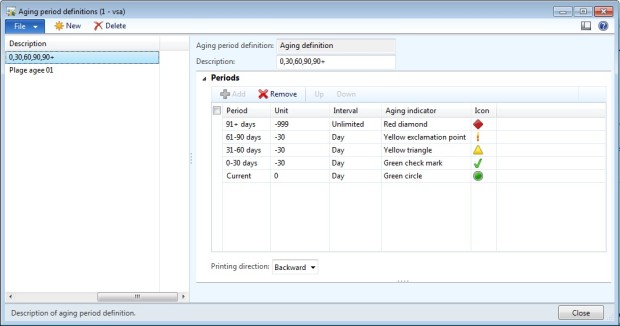
Create an Ageing period definition: display NYD, Current, 0-30, 31-60, 61-30, 91+
  • Click [New]
  • Enter a Ageing period definition name: Aged_Trial_Balance
  • Enter a description: example Ageing Not Yet Due to 90+ Days
  • In the periods, create a first period with
    • Period = Not yet due
    • Unit = 999
    • Interval = Unlimited
    • Select an ageing indicator
  • Create the second period
    • Period = Current
    • Unit = 0
    • Interval = Day
    • Select an ageing indicator
  • Create the third period: this period includes invoices due from current to -30days
    • Period = 1-30 days
    • Unit = -30
    • Interval = Day
    • Select an ageing indicator
  • Create the fourth period: this period includes invoices due from -31 days to -60 days
    • Period = 31-60 days
    • Unit = -30
    • Interval = Day
    • Select an ageing indicator
  • Create the fifth period: this period includes invoices due from -61 days to -90 days
    • Period = 61-90 days
    • Unit = -30
    • Interval = Day
    • Select an ageing indicator
  • Create the last period: this period includes invoices due from -91 days to unlimited
    • Period = 91+ days
    • Unit = -999
    • Interval = UnlimitedSelect an ageing indicator
  • Select printing direction = Backward
Ageingdefinition

Example in Accounts receivable > Common > Collections > Collections
Ageingdefinition2

Setup Procurement workflow


Setup Procurement workflow


This article describes how to setup a procurement workflow. You can setup a workflow at the header level or at the line level (each line need an approval). If you setup the workflow at the line level, the PR is processed only when all the lines are approved.

Workflow at the header level

Access: Procurement and sourcing > Setup > Procurement and sourcing workflows
  • Click “New”
  • Select workflow type = “Purchase requisition review”
  • Click “Create workflow”
image
  • Add an approval element and linked it to the Start and the End
image
  • You can add a Review task before the approval
image
  • Complete all the elements with:
    • Notification
    • Assignment
    • Conditions…
Once the workflow is ready and the Error pan empty, click “Save and close” and active the workflow

Workflow at the line level


Access: Procurement and sourcing > Setup > Procurement and sourcing workflows
To setup a workflow at the line level, you need two workflows:
  • One workflow with the type = “Purchase requisition review”
  • One workflow with the type = “Purchase requisition line review”
1.Purchase requisition line review
  • Create the “Purchase requisition line review” workflow
image
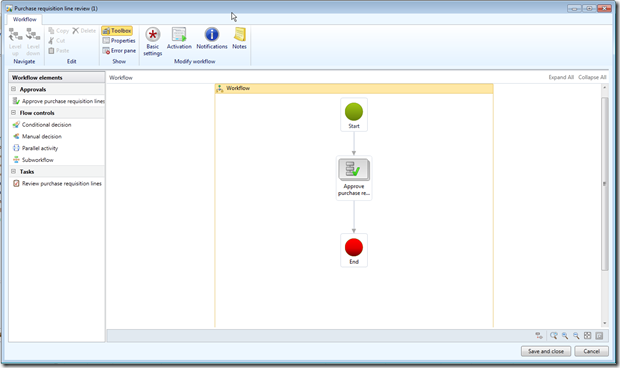
  • Create the workflow with approval element
  • Add condition, review task,….
image
Complete all the elements with:
      • Notification
      • Assignment
      • Conditions…
Once the workflow is ready and the Error pan empty, click “Save and close” and active the workflow
2.Purchase requisition review (Header)
  • Create the “Purchase requisition line review” workflow
  • Add a “Purchase requisition line item workflow” element
image
  • Click “Properties”
  • And select the workflow created in step 1
image
  • Click “Save and close” and active the workflow

Import data with the DIEF


Import data with the DIEF


This article describes how to import data with the DIEF in Dynamics AX 2012

Step1: Import the file in the staging table

Access: Data Import Export Framework > Common > Processing group
  • Click “Get staging data”
dief001
  • Job ID is given by the system
  • Enter a description
image
  • Click “OK”
  • Click “Preview” to check if information are correct
image
  • Click “Run”
  • and “OK”
image
  • · Data are created in the staging table
image

Step2: Import data to the target

  • Click “Copy data to target”
dief002
  • Select Job ID used above
  • Click “OK”
image
  • Click “Run”
image
  • Click “OK”
image
  • · Records are created
image

Create a processing group for positions with the DIEF


Create a processing group for positions with the DIEF


This article describes how to create a processing group to import positions with the DIEF in Dynamics AX 2012

Position

Access: Human Resources > Common > Organization > Positions > Positions
I need to import:
  • Position
  • Description
  • Report to position
  • Assignment date
image
Note: The “Report to position” in the DIEF is created via the Relationship. That why you need to setup to fields with value Hierarchy name+Position Id
dief003

Setup the Processing group – Option CSV file

Access: Data Import Export Framework > Common > Processing group
  • Click “New” and enter a name and a description
image
  • Click “Entities”
  • Select Entity = Positions
  • Format = CSV
  • Select the two options
image
  • Click “Generate source file”: the wizard form is open
  • Click “Next”
  • Select the fields below
    • Position = Position Id
    • Description = Description
    • Report to position = HcmPositionHierechy_ParentPositionId and HcmPositionHiearchyType_Name
    • Assignment date = HcmPositionDuration_ValidFrom
image

  • Click “Generate sample file”

A csv file is open and contains all the fields selected above
image
  • Click “Finish”

  • Complete the file with all the positions you want to import and add the path to the processing group.
image
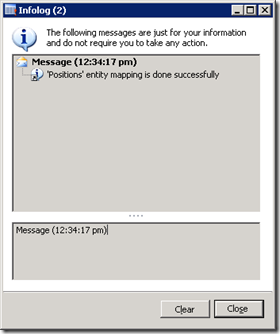
  • Click “Generate source mapping”
image
  • Click “Validate”
The processing group is now created and can be use to import data.
Remark: If the report to position refer to positions include in the same file, you will need to import twice the file:
  • First round to create all positions
  • Second round to assign the report to position

Purchase requisition workflow


Purchase requisition workflow:


This article describes how to set up in the purchase requisition workflow the approval element done by the project manager.

1/ Create a workflow Participant

Access: Procurement and sourcing > Setup > Policies > Purchase requisitions expenditure reviewers
  • Click “New” to create a new expenditure reviewer
  • Select the company
  • Select “Project Manager”
image

2/ Setup the workflow

Access: Procurement and sourcing > Setup > Procurement and sourcing workflow
In the workflow, line or header level, add a condition element to check if there is a project populated in the purchase requisition:
image
  • Click “Properties”
  • Enter a new title
  • Select the condition:
image
Add a new approval element
image


Click “Properties” and enter all the information:
  • Title
  • Notifications
  • Actions allowed
image
Go to the level down, to complete the approval step
image
  • Populate all the text required in the Basics settings
  • Click “Assignment”
  • Select “Participant”
image
In the Role base tab:
  • Select Type of participant =  Expenditure participants
  • Select participant = Project manager
image
  • Complete the time limit and the completion policy
Check that the error panel is empty and save the new version of the workflow
image
The workflow is going to refer to the project setup, to assign the approval to the project manager:
image

Dynamics Excel Add-In


Dynamics Excel Add-In


This article presents an example of the Excel Add In utility in Dynamics AX 2012

Step 1: Identify the table in Dynamics AX

  • Open the table you want to use in Excel Add In
  • Right click > Personalize
image
  • Note the table name
image

Step 2: Import the table in Excel

  • Open Excel and go to the Dynamics AX tab
  • Click “Connexion”
  • Select the company
image
  • Click “Add data”
  • Select “Add table”
image
  • Retreive the table and add it to the Selected table area
image
  • Select option “Create worksheets”
  • Click “OK”
image
  • Table is open in Excel:
  • Key fields are automatically selected
image


  • Add column:
  • Double click to add a column
image

Step 3: Refresh the data of the table

  • Close the “Field Chooser” bar
  • Click inside the table
  • Click “Refresh  All” > “Refresh Current”
image
  • All the data from Dynamics AX are loaded in the Excel file
image

Step 4: Update or create a new record

You can now update the data:
  • for example the description
image
And load the updated data into Dynamics Ax
  • Click “Publish” > “Publish selected” to publish only the current worksheet
image
  • Once the data are published, a new sheet is created with the details of the import status
image
  • Check in Dynamics AX: the table has been updated
image
Or you can add a new record:
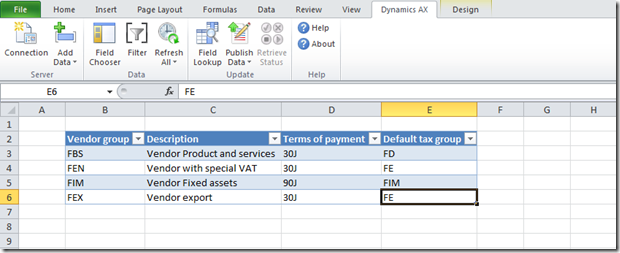
  • Create a new line in the excel table
  • Populate all the fields
image
  • Click “Publish all”
Remark: If there is an error (a code does not exist for example), the error will be describe in the status report and the record is not imported.
  • Check in Dynamics AX: new record has been created
image