In this post I’m going to be running through the steps required to
process an arrival journal using the arrival process. I will cover the
pallet receiving process in a separate blog as it has a few additional
parameters to consider. (This is AX 2012 R1/R2).
The first task in setting up our receiving process will be to setup a Basic Item, to do this follow these steps:
Once you have set the information above up you will need to setup an arrival journal type, this will be used by AX to dictate how the item reacts through the system. To do this follow the instructions below:
Above we have completed the following business processes:
The first task in setting up our receiving process will be to setup a Basic Item, to do this follow these steps:
- Open Product information management > Common > Released products
- Click New > Product
- Enter the following:
- Product type – Item
- Product subtype – Product
- Product name – Receive-Test
- Item model group – FIFO (or similar)
- Item group – (any)
- Storage dimension group – (Site, Warehouse and location controlled)
- Tracking dimension group – (Batch physical inventory)
- Stock/Purchase/Sales/BOM unit – (any)
- Purchase/Sales VAT group – (any)
- Click OK.
Once you have set the information above up you will need to setup an arrival journal type, this will be used by AX to dictate how the item reacts through the system. To do this follow the instructions below:
- Open Inventory and warehouse management > Setup > Journal names, warehouse management
- Create a new Item arrival and select confirm that the following parameters are un-ticked:
- Pallet transports – If you have this tick you will need to be using pallet controlled items. This will generate pallet transports.
- Check picking location – If you want to use ‘2 stage receive’ i.e. receive the stock onto the inbound dock first then put the stock away to the items default picking location tick this tick box.
- Check bulk location – If you are using pallet controlled items you can select this tick box to manage the bulk location put away.
- Save the journal name.
- Open Procurement and sourcing > Common > Purchase orders > All purchase orders
- Create a new purchase order for an supplier and select the item created above.
- Confirm this purchase order. Note – You don’t need to confirm for the order to show in the arrival overview. However you will need to confirm if you want to generate the purchase receipt from the arrival overview.
- Open the arrival overview screen Inventory and warehouse management > Periodic > Arrival overview
- Click Setup and select the setup as follows:
- Restrict to site – Set to the site create above
- Journal : Name – Set the arrival journal created above
- Purchase orders – Select the Purchase orders tick box
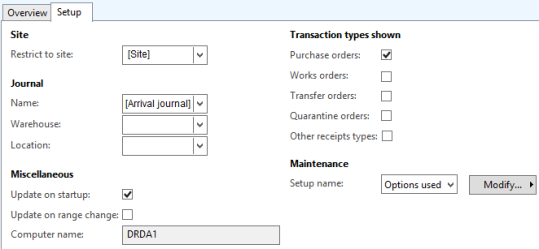
- Next we can choose to save this setup, to do this click Modify > Save as Select a name and click save.
- Navigate back to the overview tab.
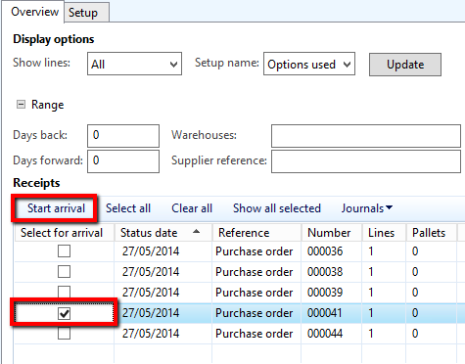
- In the Display options section there should be an option called Setup name this should allow you to select the setup selected and other versions you might look to setup.
- Set your date range to pick up the purchase order created.
- Select this purchase order and click Start arrival.
- This should bring up an info log detailing the arrival journal created, double clicking this will take you directly to the arrival journal. If you need to find this selection at a later date click Journals > Show arrivals from receipts
- Once in the arrival journal click Lines
- Once on the arrival journal lines enter the required information including:
- Site and warehouse
- Put away location
- Batch ID
- Quantity etc..
- On the head click Post This should then post the arrival journal.
NOTE – If you had the item model group parameter Supplier batch – Purchase registration selected an additional window would appear at this point allowing you to key in the vendor batch details.

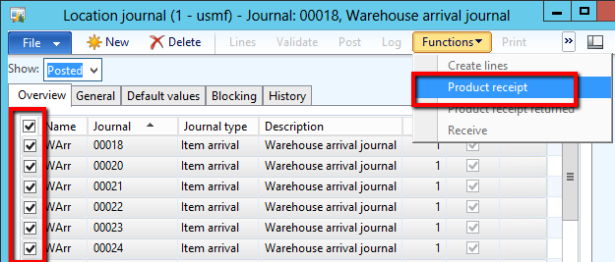
- Open Inventory and warehouse management > Periodic > Arrival overview
- Click Journals > Product receipt ready journal
- Select the arrival journals you would like to generate the receipt for and click Functions > Purchase receipt
- The purchase receipt screen will then be loaded and present the user
with the opportunity to enter the different purchase receipts:
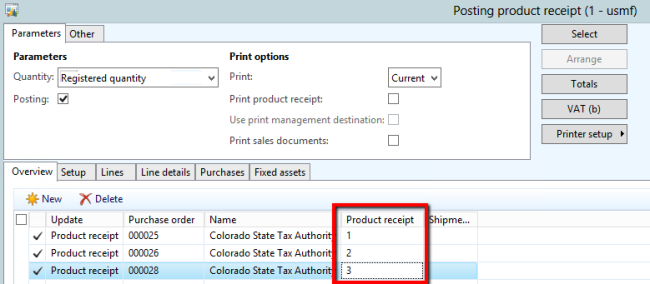
- Click OK to post these receipts.

Above we have completed the following business processes:
- Overview screen of purchase order scheduled to arrive
- Start the arrival for these orders and specify the put away locations
- Update multiple product receipts in one go after checking the stock into its location.
No comments:
Post a Comment