Below I have detailed the steps involved in setting up ASN for AX 2012 R1/R2:
- Open System administration > Setup > Services and AIF > Outbound ports
- Create a new Outbound port
- Give the Port a name and description e.g. ASN
- In the field Adapter Select the option ‘File system adapter’
- Setup a URL/File location for the XML file to be saved to
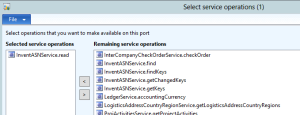
- Click Service operations
- In the Popup window find the service ‘InventASNSerivce,read’ and move it to the left hand pane using the chevron ( < )
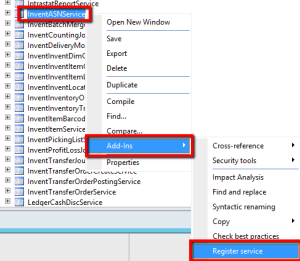
a) If you cannot find the service ‘InventASNSerivce’ you will need
to register this via the AOT. To do this follow the
steps below:
i. Open the AOT and navigate to Services > InventASNService
ii. Right click Add-ins > Register service
iii. If you refresh your service operations in the outbound port setup these services should now be available.
- Tick the option ‘Customise documents’ and then select the Data Policies option
- Within the Data Policies click Enable all
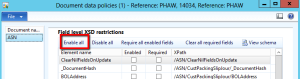
- Then click Close
- You can chose to setup different value mappings at this point such as:
- Customer numbers (internal or external)
- Address information (internal or external)
- Item codes (internal, external and Barcodes)
- Units of measure (internal or external)
- Currency codes (internal or external)
- Delivery methods (internal or external)
- Terms of delivery (internal or external)
- Charge codes (internal or external)
- VAT codes (internal or external)
- Activate you outbound port
Now you will need to create a batch job to process your ASN’s, to do this follow these steps:
- Open System administration > Setup > Batch groups
- Create a new batch group called ASN
- Add the appropriate AOS’s to this batch group
- Save your changes
- Open System administration > Inquires > Batch Jobs > Batch Jobs
- Click Ctrl + N, Enter a name for the Job and then click F5
- Click View tasks
- In the Overview section crate two line with the following setup:
| Task description |
Company accounts |
Partition Key |
Class name |
Class description |
Has conditions |
Run location |
Batch group |
| ASN |
[Your legal entity] |
initial |
AifOutboundProcessingService |
AIF outbound processing service |
No |
Server |
ASN |
| ASN2 |
[Your legal entity] |
initial |
AifGatewaySendService |
AIF gateway send service |
No |
Server |
ASN |
- Close the task screen
- On the Batch Job screen select Recurrence and set the job to process ever minute (optional time frame)
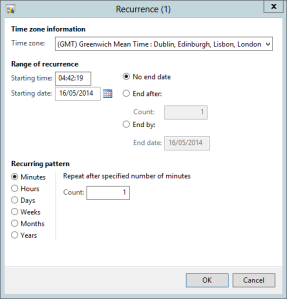
- Click OK
- Now you will need to set your batch job to the appropriate status now. To do this click Functions > Change status
- Select the status Waiting
Now this has been setup we will be able to validate that this works. to do this follow the steps below:
1. Outbound rule setup as follows:
| |
Auto Send Shipment |
Deliver Picked Items |
Description |
Outbound Rule |
Set Picking Line Status To |
| |
No |
Yes |
WMS |
WMS |
Staged |
- Create a shipment template to automatically create shipments using the outbound rule above
- Generate a Sales order with an item which will be picked up by the template created in step 1. Sales and marketing > Common > Sales orders > All sales order
- Generate the output orders for the sales order
- Open the shipment screen Inventory and warehouse management > Common > Shipment
- Find the shipment created from your sales order.
- Activate your shipment Functions > Activate
- Open your picking route and pick your order. Inquires > Picking list then Update > Update all
- Deliver the items
- On the shipment screen click Shipment staging
- In the shipment overview click Functions > Load entire shipment
- On the shipment screen click Functions > Send
- On the shipment screen click Functions > Delivery note
- On the shipment click Functions > Send ASN
If you now giver the service and the batch job time to process you
should find that the XML document has now been created in the designated
file location.


No comments:
Post a Comment