Hi All,
In this post we will be looking at the standard functions available within AX around shipments using the Pallet transport functionality.
Suggested reading:
http://blogs.msdn.com/b/dynamicsaxscm/archive/2010/12/21/wms-related-question-and-answers-on-dynamics-ax.aspx
http://kurthatlevik.wordpress.com/2012/10/08/shipping-container-labeling-guide/
https://patrickhawker.wordpress.com/2014/05/16/ax-2012-asn-setup/
Firstly we will need to look at our setup for shipments. Shipments are created and managed through the shipment template, this template will dictate multiple attributes such as the reservation sequence, shipment building logic and the required shipment stages.
SECTION 1
Lets start by setting up our shipment reservation sequence/combinations. AX use’s this shipment reservation screen to control the order in in which AX should reserve the stock attached to your shipment based on warehouse and location type (NOTE – AX will also apply FEFO/FIFO rules too).
We have now setup out reservation logic for AX to use when reserving stock against our shipments. Next we will need to create our Outbound rule, the outbound rules define how you work through the shipment, such as will loading be required in order to send the shipment.
We have now setup the different controlling factors for the shipment we can now setup the shipment template. The shipment template acts as a ‘template’ for the processing of shipment which can be controlled based on the output stock transactions, for example if you have a specific customer that you always consolidate their orders rather than sending order by order, or you sell a specific item that needs to be sent in one shipment.
We have now setup our shipment template and other areas around it. Next we will raised the sales order which will generate our shipment. NOTE – You will need to have a pallet controlled item in stock, also your item model group should have ‘Consolidated picking’ selected.
SECTION 5
So, we’ve created our shipment based on our sales order/orders. Next we need to pick our shipment, generate our pallet transports and ship or shipment.
Before you do this make sure that you have stock of the product you are shipping in a Bulk location (this will then generate the required pallet transports).
In this post we will be looking at the standard functions available within AX around shipments using the Pallet transport functionality.
Suggested reading:
http://blogs.msdn.com/b/dynamicsaxscm/archive/2010/12/21/wms-related-question-and-answers-on-dynamics-ax.aspx
http://kurthatlevik.wordpress.com/2012/10/08/shipping-container-labeling-guide/
https://patrickhawker.wordpress.com/2014/05/16/ax-2012-asn-setup/
Firstly we will need to look at our setup for shipments. Shipments are created and managed through the shipment template, this template will dictate multiple attributes such as the reservation sequence, shipment building logic and the required shipment stages.
SECTION 1
Lets start by setting up our shipment reservation sequence/combinations. AX use’s this shipment reservation screen to control the order in in which AX should reserve the stock attached to your shipment based on warehouse and location type (NOTE – AX will also apply FEFO/FIFO rules too).
- Open Stock and warehouse management > Setup > Distribution > Shipment reservation combinations
- Within this screen we will define the location priories for our reservations, e.g. Try to reserve against the items picking location first followed by bulk locations etc..
- In this screen click New
- Create your self a new combination, Below I’ve attached an example
of a combination I created which would look to create pallet
transports/reserve from the bulk area and then reserve stock in the
items primary picking location followed by any picking location followed
by bulk locations, outbound location and inbound locations. I have also
set my item picking location to trigger pallet refills (we will not
generate any in this blog but it will be covered separately at some
point!).
NOTE – For more information on this I would suggest reading this blog: http://axrachit.blogspot.co.uk/2014/04/ax2012-r2-cu7-pallet-transports-part-iv.html 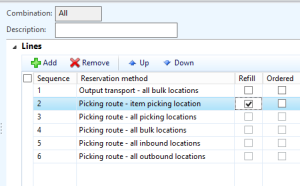
- NOTE – To understand these methods better I’d suggest reading the msdn article here: Reservation methods
- Next we need to create the shipment reservation sequence, the reservation sequence will define which warehouse’s within your site you should reserve against (in order of priority) based on the reservation combination created above.
- Open Stock and warehouse management > Setup > Distribution > Shipment reservation sequence
- Create a new sequence, click New
- Enter a Sequence Id, description and Site for this rule (these rules are restricted by site).
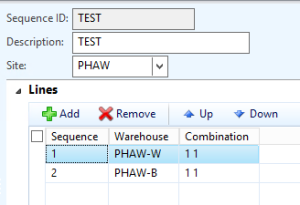
- In my example I have two warehouse’s a main Sales warehouse (PHAW-W) and a bulk storage warehouse (PHAW-B)
- Against these warehouse’s select the combination rule created in 4, this should look like this:
- Once you have done this close the forms.
We have now setup out reservation logic for AX to use when reserving stock against our shipments. Next we will need to create our Outbound rule, the outbound rules define how you work through the shipment, such as will loading be required in order to send the shipment.
- Open Stock and warehouse management > Setup > Distribution > Outbound rules
- Click New
- Give your rule a name and description.
- Next you will need to configure the parameters on this screen, these are as follows:
- Deliver picked items – Allows you to set your shipment to a status of staged – NOTE – this will not move the picked stock from the stock location into the outbound location.
- Allow send from shipment status – This will enable the ‘Send’ function on the shipment functions screen depending on a specific status.
- Auto send shipment – Based on the allow send shipment status AX will automatically post the shipment. (I do not suggest using this as you cannot reverse the sending of a shipment)
- Print shipment list – Pre-selects the option to print the shipment list when sending the shipment
- Create bill of lading – Pre-selects the option to create the bill of lading
- For my example I will be forcing my users to load the shipment prior
to sending the shipment and I will be sending it manually. This setup
looks like this:

- Save and close this form.
We have now setup the different controlling factors for the shipment we can now setup the shipment template. The shipment template acts as a ‘template’ for the processing of shipment which can be controlled based on the output stock transactions, for example if you have a specific customer that you always consolidate their orders rather than sending order by order, or you sell a specific item that needs to be sent in one shipment.
- Open Stock and warehouse management > Setup > Distribution > Shipment templates
- I will be creating a shipment template for my main sales warehouse, PHAW-W, I will also be creating this for a specific customer, 1103.
- Create a new shipment template, Click New
- Set the priory to 1 (Priorities are used by AX to determine the order in which template should be found, so for example you could have a priority of 100 as a sweeping shipment template to pick up and output orders that ‘fell through the net’)
- Enter a shipment template in my case “Cave Wholesales – TEST” (This will be the name that appears on your shipment later)
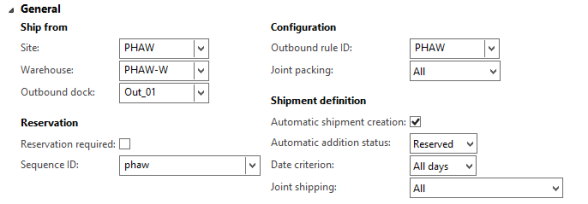
- Next will need to fill in the appropriate fields:
- Site – Select your site
- Warehouse – Select the warehouse this template should be active for
- Outbound dock – This will be the default outbound dock on the shipment when generated
- Reservation requirement – This will require the entire shipment to be available for reservation when activating, if un-ticked AX will create a picking rout for the stock that can be reserved.
- Sequence ID – [Use sequence created above] *see Section 1 of this post
- Outbound rule ID – [Use outbound rule created above] *see Section 2 of this post
- Joint packing – Select All – This will guide AX how the orders should grouped when you create picking routes.
- Automatic shipment creation – Set this to Ticked – Automatically create shipments using output orders generated in AX.
- Automatic addition status – Select Activated – Status in which output orders can be added to the shipment.
- Data criterion – Select All days – This will group shipments based on their requested ship date e.g. Today all for today, Next week All orders with request ship date today +7
- Joint shipping – Select All – This decides how shipments should be grouped.
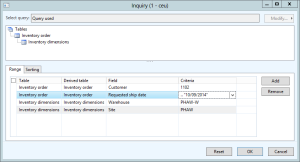
- Next we will need to set the criteria for this template as I will be setting this template for one customer (To give me the correct shipment description), to do this click Criteria this can be found in the tool bar on the shipment screen.
- In your inquiry screen click Add and select the following:
- Click OK and save your shipment template.
We have now setup our shipment template and other areas around it. Next we will raised the sales order which will generate our shipment. NOTE – You will need to have a pallet controlled item in stock, also your item model group should have ‘Consolidated picking’ selected.
- Click Sales and marketing > Common > Sales orders > All sales orders
- Click New
- Raise an order for the customer defined in your shipment template, in my example this would be 1102
- Next raise an order for your required pallet item. The pallets in my example are 100 unit pallets so I’m going to raise an order for 275, 2 full pallets (100 units each) and 75 units pick.
- Make sure your order is set to the site and warehouse as defined in your shipment template and click Pick and pack > Picking list (NOTE – you might need to refresh your screen).
- Click OK
- Navigate to Stock and warehouse management > Common > Shipments
- You should be able to see a shipment created with your shipment description.
SECTION 5
So, we’ve created our shipment based on our sales order/orders. Next we need to pick our shipment, generate our pallet transports and ship or shipment.
Before you do this make sure that you have stock of the product you are shipping in a Bulk location (this will then generate the required pallet transports).
- Find the shipment generated in section 4 and click Functions > Activate. This will Releasing the picking routes and the pallet transports that are associated with the delivery of this shipment.
NOTE – The shipment, pick and pallet transport should be in a status of Activated.

- From here we now have a 2 tasks:
- Picking route for the 75 units – This would typically be handed to manual picker.
- Pallet transport for the 2 full pallet moves. – This would be handed to the Forklift driver.
- We will first deal with the pallet moves, to do this navigate to Stock and warehouse management > Common > Pallet transports
- There should be two pallet transport required for this shipment, one at a time click Start transport and Complete transport to preform the pallet transport.

- This will now have the set the bulk stock to a status of Picked but
it will still be held in the bulk location rather than the destination
‘Outbound location’
NOTE – This isn’t ideal but for companies that stage their stock and require clear visibility of it, you can however always inquire on the shipment staging screen to see the outbound location of the stock. The stock will be un-available to other pickers and will not show up on counting journals.

- Next we will need to complete the picking route for the remaining 75 units. To do this navigate to Stock and warehouse management > Common > Picking routes
- For my picking route I will be using a picking pallet to pick the
remaining quantity, 50 units will come from a picking location the other
25 have actually been manually picked from the bulk location. On the
Picking route screen select the picking route you would like to work on
and click Create picking pallet, Select the pallet type to be used and click OK
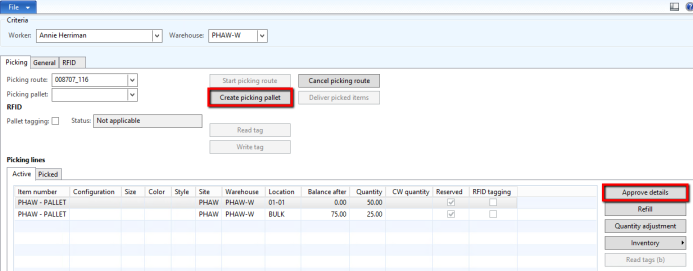
- Next the picker will need to confirm the picked goods, to do this click Approve details, in the screen that open validate the information (e.g. make sure that the pallet being picked from does in-fact have the required goods) and click Pick Selected
- Do this for all lines created, upon posting the final line you will be presented with the option to deliver the items. When this comes up click Deliver items
- If you navigate to your shipments again you will notice that the shipment has now moved to a status of shipped and the pick and pallet transport should be completed.
- On your shipment click Shipment staging, This should display you with an overview of the pallets picked.
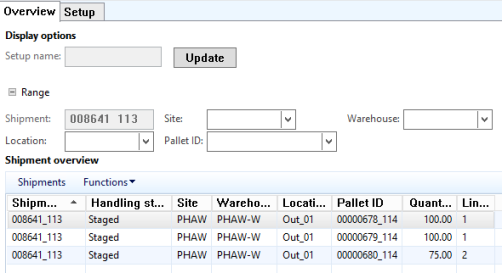
- We have now picked and staged our shipment. The final step will be to load the pallets onto the shipment, to do this you can either click Functions > Load entire shipment or Load (pallet by pallet)
- Upon loading all pallets the shipment will be ready to Send, you can at this point print of your consolidated delivery note and send your ASN. This can be done from the shipment screen by clicking Functions > Delivery note, On the delivery note you then have the option to print the shipping labels generating the delivery note from here will also generate the ASN document. (you can re-send the ASN through the functions Send ASN).
- The final step will now be to set that shipment to ‘Sent’ to do this click Functions > Send from the shipment. This will change your shipment to a status of Sent.
Today, I went to the beachfront with my kids. I found a sea shell and gave it to my 4 year old daughter and said "You can hear the ocean if you put this to your ear." She placed the shell to her ear and screamed. There was a hermit crab inside and it pinched her ear. She never wants to go back! LoL I know this is completely off topic but I had to tell someone!
ReplyDeletepallet transport from sydney to perth