Interview Questions

Monday, September 21, 2015

Fiscal year calendar and ledger calendar in Dynamics Ax 2012

In Dynamics Ax 2012, Fiscal year is common all the legal entities. They usually define in initial step of implementation. The length of Fiscal years is up to user how long he defines the length according to requirement.
They are essential for financial reporting for particular company. Define the account period or begin and end date for one financial cycle. 
In Some countries, Fiscal year usually starts from Diff.-Diff. dates. 
You can define the fiscal year from following link
General Ledger-> Setup-> Fiscal Years
4-9-2015 7-25-02 AM
4-9-2015 7-25-31 AM
 By clicking on above link all Fiscal years appears as follow 
FiscalYear
We can add Fiscal year as follow by clicking on new fiscal year in Dynamics Ax 2012
4-9-2015 7-55-13 AM
You need to enter required fields information and the time duration then you need to give length of period in Months, Days or Years. Then click on Create button.
Ledger Calendar : Are based on fiscal year calendar. Every ledger transaction is mapped in open period of fiscal year selected as ledger calendar. You can find ledger calendar form following link
 General Ledger-> Setup-> Ledger
Ledger
From Fiscal calendar dropdown, you can change the fiscal year calendar in Dynamics Ax 2012.
Ledger det
And from above menu button, we can see the detail of selected fiscal year calendar
 I changed the fiscal year in ledger I got following message 
4-9-2015 8-31-48 AM
“The fiscal calendar has been updated. We recommend that you run the recalculate ledger period process.”
 To Recalculate ledger period click on top menu.
recaluclate
Following dialog box which run the batch process, You can set it re occurrence. Click ok to recalculate the ledger period process.
reoccurance

Microsoft Dynamics AX 2012 – Do not Allow Manual Entry on Ledger Account.

The integrity between financial module represented in the ledger accounts and sub ledgers should be controlled where ensuring all transactions are posted to GL through sub modules.
Microsoft Dynamics AX 2012 gives a very decent control on the ledger accounts which is preventing any transaction posted to the GL account directly in other words any transactions hitting this accounts should be posted from the sub modules posting profile. This check box is Do not Allow Manual Entry which formerly known by Locked in Journal in Microsoft Dynamics AX 2009.
General Ledger, Setup, Chart of Accounts, under administration, Do not allow manual entry check box.
If a user tried to use this account in a transaction the following infolog will pop up “Value (account number) is not allowed for manual entry. Enter another value”
- See more at: http://blog.mohamedaamer.com/microsoft-dynamics/microsoft-dynamics-ax-2012-do-not-allow-manual-entry-on-ledger-account/#sthash.SntY7kKx.dpuf

'Consolidate Invoices’ functionality for PO in Ax 2012

Let’s see the use of one of the example of Summary update option ‘Automatic summary’;
Main Setup:
  1. Setup of Summary Update option @ vendor master form
Select a vendor -> Setup -> Check the option you want to use for Automatic Summary
PO_Vendor


  • Navigate to Accounts payable -> Setup -> Summary update parameters form – Invoice
  • Select criteria as Currency, Invoice account and Mode of delivery
  • Close the form
PO_Summary Update


Now create two new orders which should fulfill the matching criteria of above mentioned selection;
In following highlighted PO,
  • invoice account is same
  • Currency is same as ‘INR’ (not visible here)
  • Mode of delivery is same ‘TRUCK’ (not visible here)
PO_Invoice account


  • Navigate to Accounts payable -> Periodic -> Maintain vendor invoices form
  • Click on menu button ‘From product receipt’
  • System opens the new page with the list of orders which are product receipt posted but not invoiced
  • Select above mentioned orders 37 and 39 which have common Invoice account as DYTE-000001
  • Press Ok
  • Don’t forget to mention ‘Invoice number’ for both the selected orders
PO_Selection of Prod Rec


• Now click on menu button ‘Consolidate invoices’
• System opens a new screen
• Select Order type as ‘Purchase order’
• Select summary update option as ‘Automatic summary’
PO_Selection of Automatic sum


  • Click ‘Consolidate’
  • Here system validates the parameters defined in ‘Summary update parameters’ form. If all parameters get validated, system will consolidate both the orders and post both the orders against single invoice id.
  • In case of parameters do not get validated, system will post both the orders separately.
Since in our case all the parameters are fulfilled, system should consolidate both the orders.
Here system consolidates both the orders against single Invoice id.
PO_Single Invoice Id


Press Ok to post the invoice.

To cross check if both the orders got posted against the same Invoice id, navigate to PO form and verify the Invoice id of both the orders.

Friday, August 21, 2015

SQL SERVER Database in RESTORING State for Long Time

A very interesting question I received the other day.
“Our database has been in restoring stage for a long time. We have already restored all the necessary files there. After restoring the files we are expecting that  the database will be in operational mode, however, it is continuously in the restoring mode. Any suggestion?”
The question is very common. I sent user follow up emails to understand what is actually going on with the user. I realized after restoring their bak files and log files their database was in the restoring state because they had not restored the latest log file with RECOVERY options.
recoveryoption SQL SERVER   Database in RESTORING State for Long Time
As they had completed all the database restore sequence (bak and log in order), the real need for them was to recover the database from norecovery state. User can restore log files till the database is no recovery mode. If the database is recovered it will be in operation and it can continue database operation. If the database has another operations we cannot restore further log as the chain of the log file after the database is recovered is meaningless. This is the reason why the database has to be norecovery state when it is restored.
There are three different ways to recover the database.
1) Recover the database manually with following command.
RESTORE DATABASE database_name WITH RECOVERY
2) Recover the database with the last log file.
RESTORE LOG database_name FROM backup_device WITH RECOVERY
3) Recover the database when bak is restored
RESTORE DATABASE database_name FROM backup_device WITH RECOVERY

How to Move TempDB to New Drive in SQL Server

Introduction
This article explains the steps you must follow to move TempDB database from one drive to another in SQL Server. However, for the changes to come into effect you must restart SQL Server Service.
Overview of Steps to move TempDB data and log files to new location are:-
1. Identify the location of TempDB Data and Log Files
2. Change the location of TempDB Data and Log files using ALTER DATABASE
3. Stop and Restart SQL Server Service
4. Verify the File Change
5. Delete old tempdb.mdf and templog.ldf files
Identify the location of TempDB Data and Log Files
In the New Query window of SQL Server Management Studio, execute the below mentioned script to identify the location of TempDB data and log file.
Use master
GO

SELECT
name AS [LogicalName]
,physical_name AS [Location]
,state_desc AS [Status]
FROM sys.master_files
WHERE database_id = DB_ID(N'tempdb');
GO

Location of TempDB Data and Log File in SQL Server
Once you have identified the location of TempDB files then the next step will be to create the respective folders on the new drive where you would like to store the TempDB data and log file. However, you need to make sure that the new location where the TempDB files are stored is accessible by SQL Server. i.e., you need to ensure that the Account under which SQL Server Service is running has read and write permissions on the folder where the files are stored.
Change the location of TempDB Data and Log files using ALTER DATABASE
Execute the below ALTER DATABASE command to change the location of TempDB Data and Log file in SQL Server.
USE master;
GO

ALTER DATABASE tempdb
MODIFY FILE (NAME = tempdev, FILENAME = 'T:\MSSQL\DATA\tempdb.mdf');
GO

ALTER DATABASE tempdb
MODIFY FILE (NAME = templog, FILENAME = 'T:\MSSQL\DATA\templog.ldf');
GO
Once the above script has executed successfully you will receive a message to restart SQL Server Service for the changes to come into effect.
The file "tempdev" has been modified in the system catalog. The new path will be used the next time the database is started.
The file "templog" has been modified in the system catalog. The new path will be used the next time the database is started.
Stop and Restart SQL Server Service
Stop and restart the instance of SQL Server for the changes to come into effect.
Verify the File Change
Execute the below TSQL to verify whether TempDB Data and Log files are residing in the new location.
Use master
GO

SELECT
name AS [LogicalName]
,physical_name AS [Location]
,state_desc AS [Status]
FROM sys.master_files
WHERE database_id = DB_ID(N'tempdb');
GO
Delete old tempdb.mdf and templog.ldf files
Final step will be to delete the tempdb.mdf & templog.ldf files from the original location.
Important Note: SQL Server doesn’t support moving TempDB Database using backup/restore and by using detach database methods.
Error Message Received when you try Backup and Restore Method
Msg 3147, Level 16, State 3, Line 1
Backup and restore operations are not allowed on database tempdb.
Msg 3013, Level 16, State 1, Line 1
BACKUP DATABASE is terminating abnormally.
Error Message Received when you try Detach Method
Msg 7940, Level 16, State 1, Line 1
System databases master, model, msdb, and tempdb cannot be detached.
Conclusion
This article explains the steps you must follow to move TempDB database from one drive to another in SQL Server.

SQL SERVER Backup Timeline and Understanding of Database Restore Process in Full Recovery Model

I assume you all know that there are three types of Database Backup Models, so we will not discuss on this commonly known topic today. In fact, we will just talk about how to restore database that is in full recovery model.
In general, databases backup in full recovery mode are taken in three different kinds of database files.
  1. Full Database Backup
  2. Differential Database Backup
  3. Log Backup
What really perplexes most people is differential database backup.
Let me narrate here a real story. One of the DBAs in local city once called me up and laughingly said that he has just found something not smart about SQL Server Product Team in terms of database backup. I just could not believe this negative remark against SQL Server Product Team so I asked him to explain me what is it. He told me that in his opinion it is an extra step when it is about Differential Database backup. I asked him how he restores his database. He replied that he starts with first full database backup and then sequentially all log backups and differential database backups. He continued his explanation and said that he has figured something interesting; that is, if he does not restore all the differential database backups and only restores log backups it just works fine. According to him this is an unnecessary step.
Well, I am extremely happy to say he is wrong. He has totally failed to understand the concept of differential database backup. I called up another friend in his company and told him this story and he found it funny too! He suggested that he will explain to my friend that he needs to do all differential backups first and then all log backups after the last differential backup. I was again amazed and didn’t know what to do. He was wrong too!
After interacting with many DBAs I have realized that it is quite confusing to most of the people how differential database is useful and many are not aware of the correct method to restorefull recovery model. Before I start explaining please understand the following diagram where I have demonstrated time line when a backup was taken.
Let us remember the golden rule for restore first.

‘After restoring full database backup, restore latest differential database backup and all the transaction log backup after that to get database to current state.’
From the above-listed rule, it is very clear that there is no need to restore all the differential database backups when restoring databases. You can only restore the latest Differential database backup. Differential database backup is the backup of all the changes made in database from last full backup; it is cumulative itself. That is the reason why the size of next differential database backup is much more than the previous differential database backup. All differential database backups contain all the data of previous differential database backups. You just have to restore the latest differential database backup and right after that install all the transaction database backups to bring database to the current state.
If you do not want to have differential database backup and have all the transaction log backups, in that case, you will have to install all the transactional database backups, which will be very time consuming and is not recommended when disastrous situation is there and getting server back online is the priority. In this way, differential database backups are very useful to save time as well as are very convenient to restore database. Instead of restoring many transaction database logs, which needs to be done very carefully without missing a single transaction in between, this is very convenient.
In our example, there are multiple paths to get server to the current state.
Path 1 (SLOWEST) : Full Database Restore >> Log Backup 0_1 >> Log Backup 1_1 to all remaining logs.
Path 2 : Full Database Restore >> Differential Database Backup 1 >> Log Backup 1_1 to all remaining logs.
Path 3 (FASTEST) : Full Database Restore >> Differential Database Backup 2 >> Log Backup 2_1 to all remaining logs.

Auditing Failed Logins in SQL Server

ProblemAn auditor has taken a look at our SQL Servers and has told us that we need to audit login failures to the SQL Servers themselves. How do we do this?
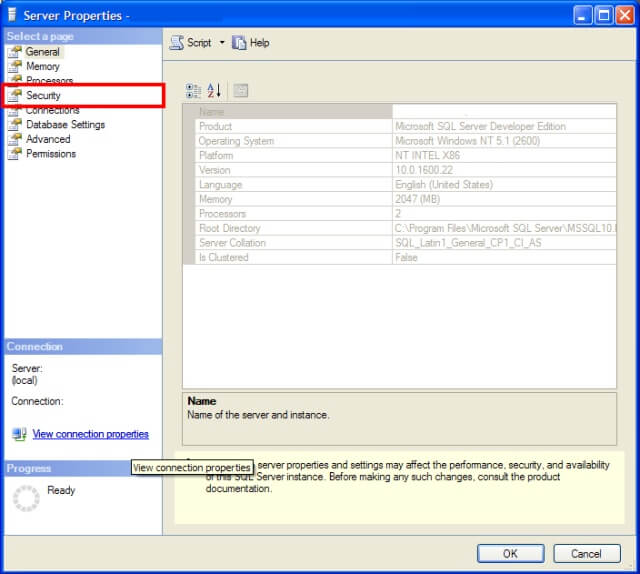
SolutionSQL Server permits the auditing of both login successes and failures, depending on your need. The way to turn this auditing on is by using SQL Server Management Studio. Connect to the SQL Server in Object Explorer and then right-click on the SQL Server and choose the Properties option from the pop-up menu. You should see the server properties like so:
Server Properties
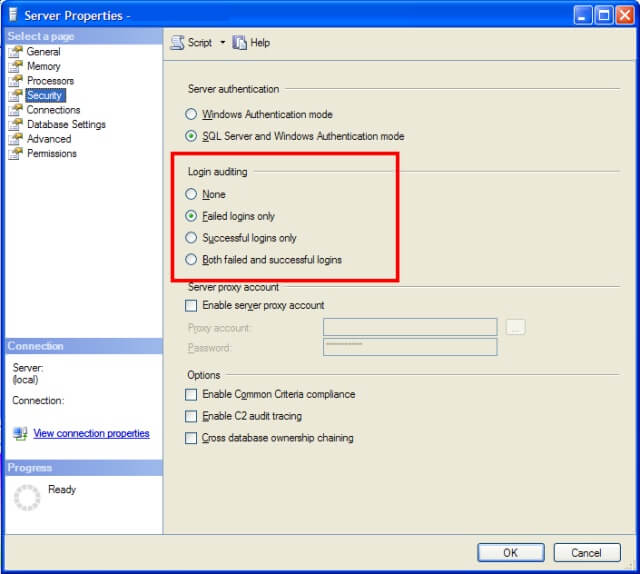
You'll want to click on the Security page (highlighted in the previous image) which will bring you to where you can set the login auditing:
Security Page
There are four options available:
  • None - Neither successful nor failed logins will be audited.
  • Failed logins only - Failed logins will be audited, but successful logins will be ignored.
  • Successful logins only - Successful logins will be audited, but failed logins will be ignored.
  • Both failed and successful logins - Login will be audited regardless of success and failure.
When you've made your choice, click the OK button. The setting for login auditing is actually a registry entry which differs based on SQL Server version and SQL Server instance name. SQL Server only reads this setting when the SQL Server service starts up. Therefore, for this setting to take effect, you'll need to restart the SQL Server service. Because it is a registry setting, the only easy way to set how to audit is through the GUI. There isn't a way using T-SQL without using one of the extended stored procedures that hits the registry directly.
A word about the various settings. At the very least, you should be auditing failed logins on production systems. There may be cases where it is necessary to audit successful logins, but realize that auditing successful logins will likely generate a lot of events to sift through. On extremely sensitive systems it is important to have this level of control. However, on less critical systems, you may be better served to only audit failed logins so you don't get overwhelmed with the number of events. If you have a log management solution, by all means audit both.

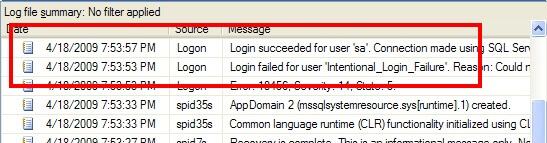
Once you've turned on auditing, the next step is to be able to find the results of said auditing. The first place where the audit information is recorded is the SQL Server log. For instance, an audit success by the "sa" account and an audit failure are shown in the following excerpt:
SQL Server log - auditing
If you want to view the contents of the SQL Server log by using T-SQL, there's an undocumented (but well known) extended stored procedure called xp_readerrorlog. You can use it to dump the results of the error log to a recordset by:
EXEC xp_readerrorlog;
To read further back, you can give this extended stored procedure an integer parameter which corresponds to the order of the SQL Server log. 0 represents the current log, with each number after that referring to the next one back. So to see the contents of the 3rd log (including the current one) you would pass a parameter of 2 (counting up from 0 - 0, 1, 2 would be the third), you would execute:
EXEC xp_readerrorlog 2;
To search the current error log and only return failed logins you can use the following command.  The first parameter specifies the error log (0=current), the second parameter specifies the type of log (1=SQL Error Log) and the third parameter specifies the message to search for.
 EXEC sp_readerrorlog 01'Login failed' 

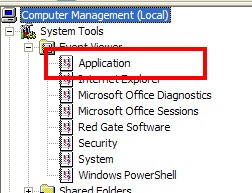
If you have log management software, another good place to look is the Application event log for the operating system. You can view this by using the Computer Management tool. If you expand System Tools and then Event Viewer, you'll see the Application event log like so:
Computer Management - App Event Log
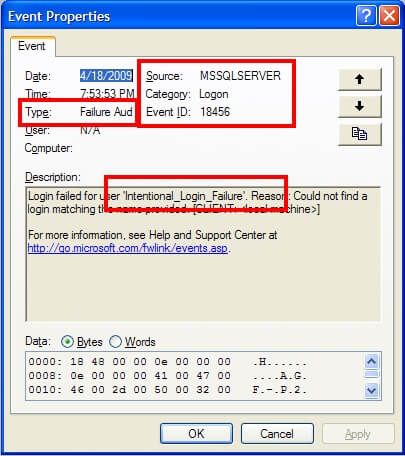
If you look in this event log, you'll be looking for events with a source of MSSQLSERVER or MSSQL$<Instance Name>. For instance, the following shows the audit success and failure events we looked at before in the SQL Server log:
App Event Log - SQL Server Login Events
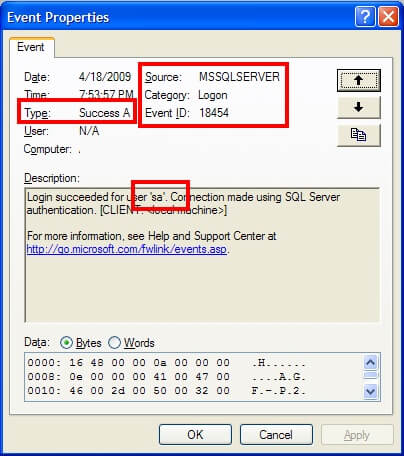
Successful logins for SQL Server 2005 and 2008 will have an event ID of 18454 and failed logins will have an event ID of 18456. SQL Server 2000 uses the same event ID for both, making it impossible to determine of the event signifies a success or failure without looking at the event details. As a result, I would recommend only auditing failures to eliminate the confusion. Once you have determined the correct events, you can look at the event log details to see what login was attempted. For instance, here is the failed login attempt:
Event - SQL Server Failed Login 
and here is the successful login attempt:
Event - SQL Server Login Success
The details of what account was attempted is stored within the description of the event log. Therefore, if you need to automate the retrieval of audit successes or failures, make sure the application can retrieve the details and parse the text accordingly.