Problem
I have to install a new Microsoft SQL Server box and configure it as a production server. I know that there are many security related settings and I do not want anyone to hack the system on the first day on the network. Which are the basic steps to harden the security of my SQL Server? Do you have a checklist to start with? Check out this tip to learn more.
Solution
There are many security related settings in the Microsoft SQL Server and you should also consider setting up processes to ensure that the security is maintained in the future. The security related tasks can be divided into four main categories: physical security, operating system level security, SQL Server configuration and user management. You should protect your server physically, have a secure OS and then you can start thinking about your SQL Server.
Physical Security
The first line of your security is the physical security of your on premise hardware. You have to protect your server from being tampered with. Here are the basic items I would recommend:
- Limit the number of employees who have access to the physical hardware. You can limit access with access codes, entry cards or even with armed security guards. The most important point is to have a minimal number of people who have access and you should have written procedures to access the server, preferably with managerial approval for physical access rights.
- Store the backup media at a secure offsite location. To increase security, it is recommended to have one location for the production server and a separate location for the backup files.
- Configure alerts for hardware warnings. To be proactive, you can configure e-mail alerts for example with HP iLO or Dell DRAC, but you can also use VMware vSphere.
Operating System Security
We live in the era of the internet, so physical security is not enough. You should build your protection plan to include Windows. The operating system should be secured to reduce the vulnerability of your system. Here are the basic items to consider:
- Install all service packs and critical fixes for Windows (and for VMware if applicable). It is necessary to implement all critical fixes to ensure that there are no known holes on your security. Consider creating a process to apply the latest Windows security patches on a regular basis.
- Configure a firewall. You need a protective firewall on your server to defend your system. If there is no other firewall installed on your server, then configure Windows Firewall to work with the Database Engine, Integration Services and Analysis Services components of SQL Server.
- Limit the number of employees who have Windows Administrator access on the SQL Server. As a best practice, you should limit the administrative access only to those who really require it. This should include the VMware console as well as Remote Desktop Services. Maybe you can consider limiting the OS level admin access to the SQL Server administrators and Network administrators.
SQL Server Installation
Now we reached the point when you can finally work with your beloved SQL Server. There are a number of security related tasks which should be completed before you can start to use a production SQL Server. Here is what I recommend as a starting point:
- Install only the required components. The less installed components, the less security problems can occur.
- Install all service packs and critical fixes for SQL Server. It is necessary to implement all critical fixes to ensure that there are no known holes on your security.
- Disable unnecessary features and services. You can use the SQL Server Configuration Manager to disable unused SQL Server services.
- Disable the unused SQL Server protocols. SQL Server supports four type of protocols: Shared Memory, Named Pipes, TCP/IP and VIA. You should use the bare minimum of these protocols and disable the others using the SQL Server Configuration Manager.
- Change the default SQL Server ports. The SQL Server gets installed with the default TCP port 1433 which is well known by admins and attackers too. You can avoid some targeted SQL attacks if you do not use the default ports. You can change the port in SQL Server Configuration Manager.
- Hide the SQL Server instance and/or turn off the SQL Server Browser Service. You can configure the SQL Server instance as hidden using the SQL Server Configuration Manager. This will prevent advertisement of your server by the SQL Server Browser service. If you use fully qualified connection strings then you can disable the SQL Server Browser.
- Restrict the access to the SQL Server configuration and database file. Apart from the database level access, you should also protect the file system to prevent unauthorized file deletion, copying or alteration of data.
- Restrict the access to the SQL Server backup folders. Read Below tip to learn how to protect your SQL Server Backup folder.
- Use Transparent Data Encryption whenever it is an option. You can secure your data, logs and backup with TDE in Evaluation, Developer, Enterprise and Datacenter versions of SQL Server 2008, 2008 R2 and 2012.
- Create only the required databases. Do not create demo or test databases on production servers, keep it clean and safe.
- Run the SQL Server Best Practice Analyzer to verify your installation. The Microsoft SQL Server 2012 Best Practice Analyzer can quickly identify if your server is configured according to industry best practices or not.
- Revoke execute rights to 'PUBLIC' on extended stored procedures. Extended stored procedures will be removed in a future version of SQL Server and it is not recommended to use them. You can use CLR Integration instead. The following extended stored procedures should not be executed by your applications:xp_availablemedia, xp_dirtree, xp_enumgroups, xp_fixeddrives, xp_regaddmultistring, xp_regdeletekey, xp_regdeletevalue, xp_regenumvalues, xp_regremovemultistring, xp_regwrite, xp_regread, xp_servicecontrol, xp_subdirs.
- Disable the xp_cmdshell option. It is highly recommended to disable the xp_cmdshell stored procedure even if other administrators can enable it again.
User Accounts
After your basic SQL Server security is configured, you can start to address the traditional user access and security topics. The administrators and the service accounts require extra attention. Here is how to get started:
- Rename and disable the SA account if your applications allow it. You can use thesp_SetAutoSAPasswordAndDisable stored procedure to disable the SA account as described in below tip. This will prevent the attacker from trying to login with the default admin account.
- Remove the BUILTIN\Administrators group from the SQL Server Logins. You can read more about the security issues with the SQL Server BUILTIN\Administrators group in Below tip.
- Use Windows Authentication mode. You can check and change the authentication mode in three different ways: using SQL Server Management Studio, with T-SQL or in the Windows registry.
- Every administrator should have a named login, shared logins should not be allowed. This is required in order to be able to identify the people behind each and every database change. It is also critical to have an up-to-date list of all the accounts.
- All accounts for named user access should be controlled by Active Directory. Use Active Directory and do not create SQL Server logins. It makes the administration easier if you grant access rights through Active Directory groups or Group Policy.
- Use service accounts for applications. It is a best practice to create a different service account with a descriptive name for every service. You can use SQL Server logins, but a complex password is a must. Restrict the access only to data required: if an application updates only 1-2 tables then it does not require full control of every object in the database.
- Configure service accounts with the least privileges. You can read Below tip if you would like to know how to determine service related privileges for SQL Server service account. Do not grant more rights than required.
- The user privileges should be minimized. Try to assign the minimum sufficient rights to every user. It is a best practice to document any elevated user permission and request managerial approval.
- All administrator accounts should have a complex password and password change should be enforced. You should identify blank and weak passwords and configure password enforcement options.
- Configure SQL Server login auditing to log both failed and successful logins. Details of the login audit configuration can be found in Below tip and there is also a tip about SYSADMIN login auditing below.
The above checklist can be used to ensure that the minimum requirements are fulfilled. Every company should have an information security policy and you should apply those requirements to your SQL Server as well. In case that policy does not exist then you can use this checklist as the basic checklist.
Tips:
1.Protecting the SQL Server Backup folder
If you look at the permission for the BACKUPS folder that the Microsoft SQL Server install creates, you've probably noted that it has permissions where members of the Administrators group has full control, meaning they can do anything they want. Actually, this is true of most every location, including a folder I just created off the root of the C:\ drive.
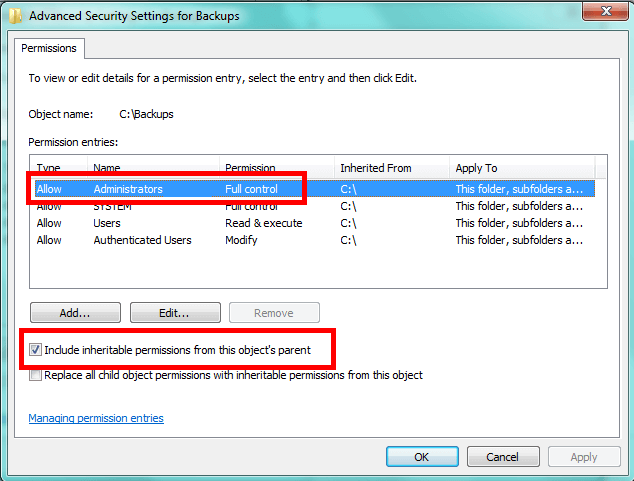
In a lot of cases the Windows Local Administrators group has inherited the permissions from a higher level folder. The solution is to break inheritance and set our own permissions. Without breaking inheritance we can only add permissions to a file or folder. We can't remove permissions, so this is a necessary step. However, to make sure you don't lock yourself out, choose to copy the existing inheritable permissions.

Before you remove any permissions, the first step I'd take is to ensure you have permission to get back and manage the folder. For instance, if all DBAs should be able to get to the appropriate folder, add the appropriate Windows group for the DBAs and give it Full Control. This allows you to modify the folder and any files contained in it as well as manage the permissions. It's this last aspect of Full Control you'll find essential. I typically grant this permission, then click OK to confirm and only then do I start removing or reducing permissions.
When I go to remove permissions, I tend to automatically eliminate the following accounts or groups:
- SYSTEM
- Authenticated Users
- Users
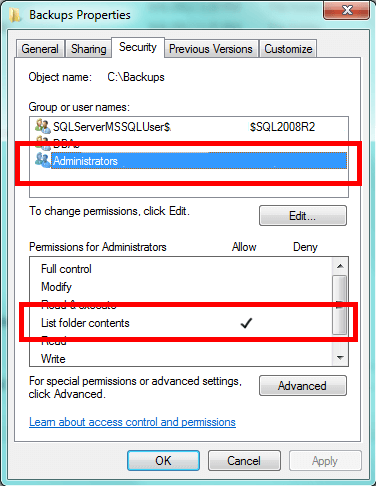
Note I didn't strike the Administrators group. Instead, I tend to reduce permissions. I still grant the local Windows Administrators the ability to see what's in the folder. Unless the local security policy has been changed, they can backup the files and folders regardless of permissions, but this doesn't typically give them the ability to view what's in the folder without the use of a 3rd party product. When it comes to disk space issues and the like, it can often be helpful for an administrator to be able to see the files. We can accomplish this by granting the following permission:List folder contents. This gives them the ability to see the files, but not read from them.
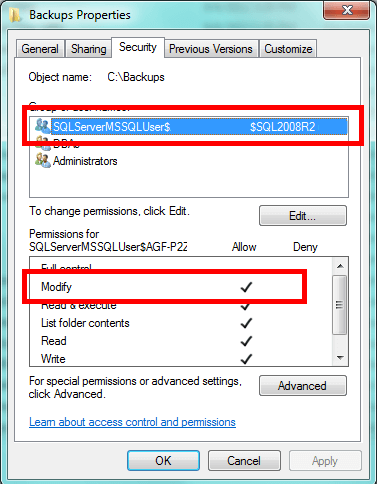
Most importantly, don't forget to give Microsoft SQL Server access. It will need Modify access for the folder. This gives SQL Server the ability to read files, write to them, modify them, and delete them. In SQL Server 2005-2008R2, there will be a SQL Server User group corresponding to the instance name. In SQL Server 2012 the access will be configured based on the service's virtual account name. Check the appropriate version of Books Online for this. Here's the pattern for SQL Server 2008 and 2008R2:
| Type of Instance | Pattern for Group Name |
|---|---|
| Default Instance | SQLServerMSSQLUser$ComputerName$MSSQLSERVER |
| Named Instance | SQLServerMSSQLUser$ComputerName$InstanceName |
If you don't have the appropriate access, you'll get the following error trying to run a backup through SQL Server Management Studio:
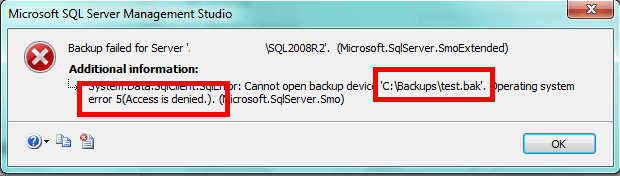
If you get this error, you're likely missing the Modify permission for SQL Server.
And that's all there is to it. While a member of the Windows Local Administrators group could still get in, he or she would have to intentionally seek to bypass security. You can't completely prevent an administrator from gaining access, however, by making it difficult you keep out the merely curious. That's the intent of altering file and folder permissions like we did here.
2.Secure and disable the SQL Server SA Account
SQL Server has an undocumented system stored procedure named sp_SetAutoSAPasswordAndDisable. This procedure will do exactly as the name suggests: it will reset the password and then disable the 'sa' login.
The procedure takes no parameters, so the syntax for usage is as follows:
EXEC sp_SetAutoSAPasswordAndDisable
GO
After completion you should see the standard message:
Command(s) completed successfully.
The actual code is as follows:
ALTER procedure [sys].[sp_SetAutoSAPasswordAndDisable]
as
    -- can execute only as SysAdmin
 if (not (is_srvrolemember('sysadmin') = 1))  -- Make sure that it is the SA executing this.
 begin
  raiserror(15247,-1,-1)
  return(1)
 end
    -- Begin a transaction
    BEGIN TRANSACTION

 -- Disable Password Policy on the SA Login
 ALTER LOGIN sa WITH CHECK_POLICY = OFF
 IF @@ERROR <> 0
 BEGIN
  ROLLBACK TRANSACTION
  RETURN (1)
 END
 -- Create a New Guid as the random password
 declare @randompwd UNIQUEIDENTIFIER
 declare @stmt nvarchar(4000)
 SET @randompwd = newid()
 SELECT @stmt = 'ALTER LOGIN sa WITH PASSWORD = ' + quotename(@randompwd, '''')
 EXEC(@stmt)
 IF @@ERROR <> 0
 BEGIN
  ROLLBACK TRANSACTION
  RETURN (1)
 END
 -- Now set the policy back
 ALTER LOGIN sa WITH CHECK_POLICY = ON
 IF @@ERROR <> 0
 BEGIN
  ROLLBACK TRANSACTION
  RETURN (1)
 END
 -- Now set the policy back
 ALTER LOGIN sa DISABLE
 IF @@ERROR <> 0
 BEGIN
  ROLLBACK TRANSACTION
  RETURN (1)
 END
 -- Commit the transaction
 COMMIT TRANSACTION
When you execute this stored procedure the password for the ‘sa' login will be reset to a random GUID, and then be disabled. Auditors love this aspect because not only is the password secure, but so is the account itself.
If you need to roll your own solution to rotate the password for the ‘sa' login, then the sp_SetAutoSAPasswordAndDisable stored procedure may be exactly what you are looking for.
3.How to determine service related privileges for Sql Server service account
I had a customer inquire as to how to verify service-related permissions for the Sql Server service account...i.e., Books Online indicates the Sql Server service account requires permission to start the following related services (amoung many other requirements): Sql Server Active Directory Helper and Sql Writer services. Obviously, the service really wouldn't NEED permissions to do so if you weren't going to make use of said services, but let's assume for the moment that we are going to do so, and that you want to determine first of all if the Sql Server service account has these permissions and/or what permissions the account has to services on the machine in question.
There's a tool called "AccessChk" which will allow you to see this type of information, along with lots of other access-related information for given accounts. You can find information on the tool at the following link:
As an example, the following command line will give you effective permissions to all services on the local machine for an account named "LTCBOYDMS\sqlService":
accesschk "LTCBOYDMS\sqlService" -vc *
To determine service-related permissions, the -c option must be used. Without it, you get by default ACL information for files/folders/shares and other information (which is handy also). If you specify the wildcard character (the *), you'll get permission related information for the given account against ALL services on the machine...if you're looking for only a specific service information, you can replace the wildcard with the appropriate service name. For example, to get effective permissions to only the SQLWriter service (the service name for the Sql Writer service), you could use the following command:
accesschk "LTCBOYDMS\sqlService" -vc "SQLWriter"
and, for the Active Directory Helper service, something like the following:
accesschk "LTCBOYDMS\sqlService" -vc "MSSQLServerADHelper"
Output from the command should look similar to the following:
C:\Projects\Toolbox\accessCheck>accesschk.exe "DUMMYDOMAIN\svcSqlService" -vc *
RW Alerter
SERVICE_ALL_ACCESS
SERVICE_ALL_ACCESS
RW ALG
SERVICE_ALL_ACCESS
SERVICE_ALL_ACCESS
RW MSSQL$SQL2000
SERVICE_ALL_ACCESS
SERVICE_ALL_ACCESS
RW MSSQL$SQL2005
SERVICE_ALL_ACCESS
SERVICE_ALL_ACCESS
RW MSSQL$SQL2005B
SERVICE_ALL_ACCESS
SERVICE_ALL_ACCESS
RW MSSQL$SQLEXPRESS
SERVICE_ALL_ACCESS
SERVICE_ALL_ACCESS
RW MSSQLServerADHelper
SERVICE_ALL_ACCESS
SERVICE_ALL_ACCESS
...
R Pml Driver HPZ12
SERVICE_QUERY_STATUS
SERVICE_QUERY_CONFIG
SERVICE_INTERROGATE
SERVICE_ENUMERATE_DEPENDENTS
SERVICE_PAUSE_CONTINUE
SERVICE_START
SERVICE_STOP
SERVICE_USER_DEFINED_CONTROL
READ_CONTROL
SERVICE_QUERY_STATUS
SERVICE_QUERY_CONFIG
SERVICE_INTERROGATE
SERVICE_ENUMERATE_DEPENDENTS
SERVICE_PAUSE_CONTINUE
SERVICE_START
SERVICE_STOP
SERVICE_USER_DEFINED_CONTROL
READ_CONTROL
...
RW SQLBrowser
SERVICE_ALL_ACCESS
SERVICE_ALL_ACCESS
RW SQLWriter
SERVICE_ALL_ACCESS
SERVICE_ALL_ACCESS
...
C:\Projects\Toolbox\accessCheck>
In the output, the "RW" designators at the beginning of each line indicate Read/Write privs (if present), then the service name, then using the -v option will provide you the additional output shown below each service above. The SERVICE_ALL_ACCESS implies all access, if you don't have that, you should see individual service related privs like in the line above for the "Pml Driver HPZ12" service.
4.Auditing Failed Logins in SQL Server
SQL Server permits the auditing of both login successes and failures, depending on your need. The way to turn this auditing on is by using SQL Server Management Studio. Connect to the SQL Server in Object Explorer and then right-click on the SQL Server and choose the Properties option from the pop-up menu. You should see the server properties like so:
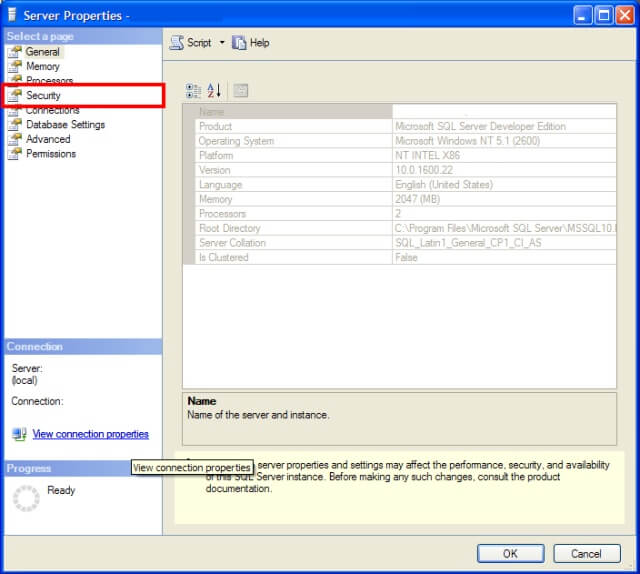
You'll want to click on the Security page (highlighted in the previous image) which will bring you to where you can set the login auditing:
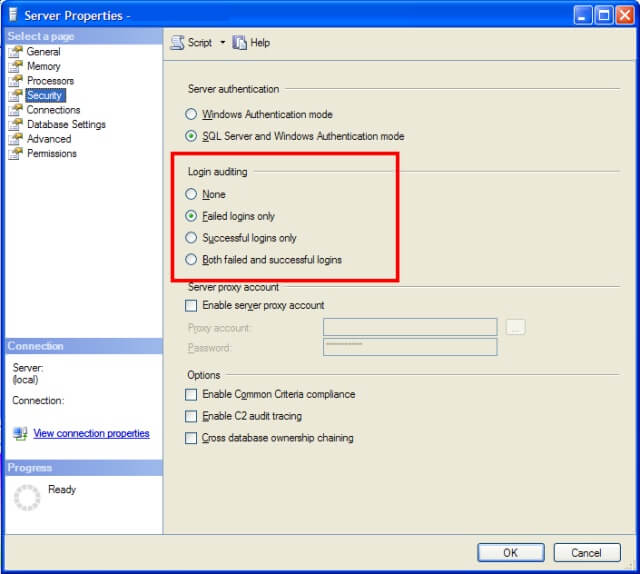
There are four options available:
- None - Neither successful nor failed logins will be audited.
- Failed logins only - Failed logins will be audited, but successful logins will be ignored.
- Successful logins only - Successful logins will be audited, but failed logins will be ignored.
- Both failed and successful logins - Login will be audited regardless of success and failure.
When you've made your choice, click the OK button. The setting for login auditing is actually a registry entry which differs based on SQL Server version and SQL Server instance name. SQL Server only reads this setting when the SQL Server service starts up. Therefore, for this setting to take effect, you'll need to restart the SQL Server service. Because it is a registry setting, the only easy way to set how to audit is through the GUI. There isn't a way using T-SQL without using one of the extended stored procedures that hits the registry directly.
A word about the various settings. At the very least, you should be auditing failed logins on production systems. There may be cases where it is necessary to audit successful logins, but realize that auditing successful logins will likely generate a lot of events to sift through. On extremely sensitive systems it is important to have this level of control. However, on less critical systems, you may be better served to only audit failed logins so you don't get overwhelmed with the number of events. If you have a log management solution, by all means audit both.
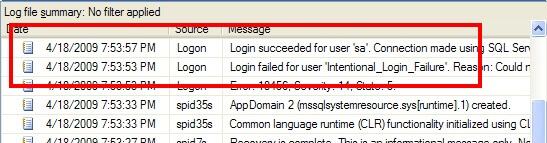
Once you've turned on auditing, the next step is to be able to find the results of said auditing. The first place where the audit information is recorded is the SQL Server log. For instance, an audit success by the "sa" account and an audit failure are shown in the following excerpt:
If you want to view the contents of the SQL Server log by using T-SQL, there's an undocumented (but well known) extended stored procedure called xp_readerrorlog. You can use it to dump the results of the error log to a recordset by:
EXEC xp_readerrorlog;
To read further back, you can give this extended stored procedure an integer parameter which corresponds to the order of the SQL Server log. 0 represents the current log, with each number after that referring to the next one back. So to see the contents of the 3rd log (including the current one) you would pass a parameter of 2 (counting up from 0 - 0, 1, 2 would be the third), you would execute:
EXEC xp_readerrorlog 2;EXEC sp_readerrorlog 0, 1, 'Login failed'
If you have log management software, another good place to look is the Application event log for the operating system. You can view this by using the Computer Management tool. If you expand System Tools and then Event Viewer, you'll see the Application event log like so:
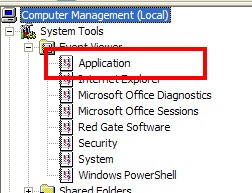
If you look in this event log, you'll be looking for events with a source of MSSQLSERVER or MSSQL$<Instance Name>. For instance, the following shows the audit success and failure events we looked at before in the SQL Server log:

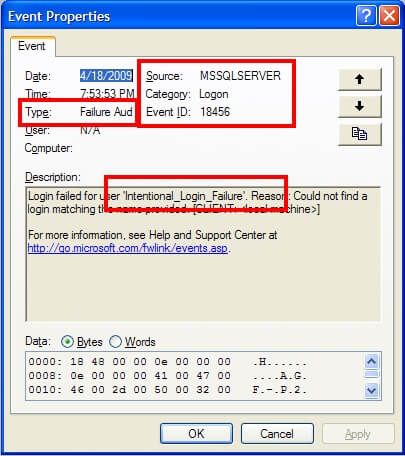
Successful logins for SQL Server 2005 and 2008 will have an event ID of 18454 and failed logins will have an event ID of 18456. SQL Server 2000 uses the same event ID for both, making it impossible to determine of the event signifies a success or failure without looking at the event details. As a result, I would recommend only auditing failures to eliminate the confusion. Once you have determined the correct events, you can look at the event log details to see what login was attempted. For instance, here is the failed login attempt:
and here is the successful login attempt:
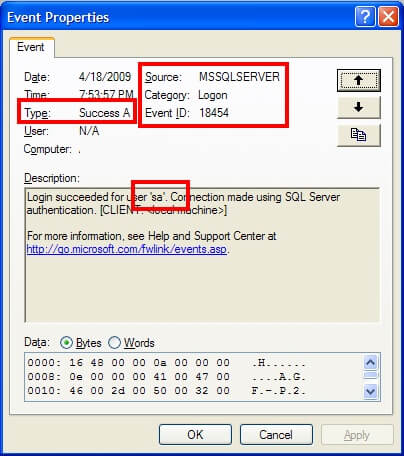
The details of what account was attempted is stored within the description of the event log. Therefore, if you need to automate the retrieval of audit successes or failures, make sure the application can retrieve the details and parse the text accordingly.
5. SQL Server SysAdmin Login Auditing
In SQL Server 2005 Service Pack 2, Microsoft introduced logon triggers into the core functionality. Like DDL and DML triggers, these triggers fire on particular events, in this case, whenever a logon to the SQL Server instance occurs. We can use a logon trigger to audit when members of a particular role, such as the syadmin fixed server role, logs on.
In order to audit for members of the sysadmin fixed server role, we will need to use two system views:sys.server_role_members and sys.server_principals. We will join these views when a logon event occurs to determine if the logon is a member of the sysadmin role or not. We can get the members by joining these two views together as shown below:
| SELECT sp.principal_idFROM sys.server_role_members srmINNER JOIN sys.server_principals sp ON srm.member_principal_id = sp.principal_idWHERE srm.role_principal_id = ( SELECT principal_id FROM sys.server_principals WHERE [Name] = 'sysadmin') |
This query will be the basis for our logon trigger. By adding an AND clause in our final set of code, we will be able to test whether or not the incoming logon is a member of the sysadmin fixed server role.
We will also need to some place to record the event when it occurs. One of the easiest ways to do this is to use a table created for this purpose in a work database. For the purposes of this example, I am going to assume the table can be stored in a DBA database by the name of DBAWork. Here is the associated code:
| CREATE TABLE dbo.AuditSysAdminLogin(AuditEventId INT IDENTITY(1,1) NOT NULL,EventTime DATETIME NOT NULL,ServerLogin NVARCHAR(100) NOT NULL,CONSTRAINT PK_AuditSysAdminLogin PRIMARY KEY CLUSTERED (AuditEventID));GO |
Once we have the audit table, we can create our logon trigger. The basic syntax for a logon trigger is similar to a DDL trigger as shown below:
| CREATE TRIGGER <trigger name> ON ALL SERVER FOR LOGON AS <SQL Statements> |
Following this format and using the query identified above to help identify who is a member of the SysAdmin role, the only aspect we are missing is a way to identify the logon. There is a system function, ORIGINAL_LOGIN(), which provides that information. Putting it all together, here is our logon trigger:
USE master; GO |
Next Steps
- Be sure to have SQL Server 2005 SP2 or later installed in order to have this functionality work properly.
- This tip provides a simple approach to capture the logins of SQL Server SysAdmins, but can be easily modified for other groups, roles or logins.
- The logic can also be modified to prevent logins from accessing the SQL Server instance during particular hours, to limit the number of sessions, etc. So think about some of the needs you have in your environment and consider this tip as a stepping stone to address those needs.
- As you experiment with this logic, please provide your problems and solutions in the forum below. We would love to hear how creative you were with the opportunities available with this favor of SQL Server triggers.