Interview Questions

Tuesday, June 23, 2015

Payments in advance ( prepayment ) To a Vendor | AX 2012

Payments in advance ( prepayment ) To a Vendor | AX 2012

This Article discuss Payments in advance ( prepayment ) to a Vendor. This article divided into three parts
  • Introduction
  • Setup (Step by step with screenshots )
  • Implementation (Step by step with screenshots )
Introduction:                                                                            

Accounting practices in many countries/regions require that prepayment journal vouchers, or payments in advance, from a customer or to a vendor not be posted to the usual summary accounts for the customer or vendor. Instead, these prepayment journal vouchers must be posted to special ledger accounts for prepayment journal vouchers. When a sales order or purchase order is made, an invoice is issued to the customer or vendor. When the invoice is paid, the prepayment journal voucher and sales tax prepayment journal voucher on the ledger accounts for the prepayment journal vouchers are reversed. The invoice amounts are then automatically posted to the usual summary accounts. 
    • Create Prepayment Posting Profile
  1. Click Accounts Payable > Setup > Vendor Posting Profiles.

  2. Click New to Create New Posting Profile


  3. Write the posting profile name in the Posting Profile Field for example "PRE".


  4. Write the posting profile description in the Description Field for example "Prepayments".

  5. Go to the Setup Section.


  6. Click the Add Button and select All form the Account Code Filed to apply the setup for All Vendors in the legal entities


  7. Select the prepayment summary account from the summary Account filed.


  8. (if required) Select the prepayments sales tax Account from Sales Tax prepayments Filed. 


  9. Press the Close Button.


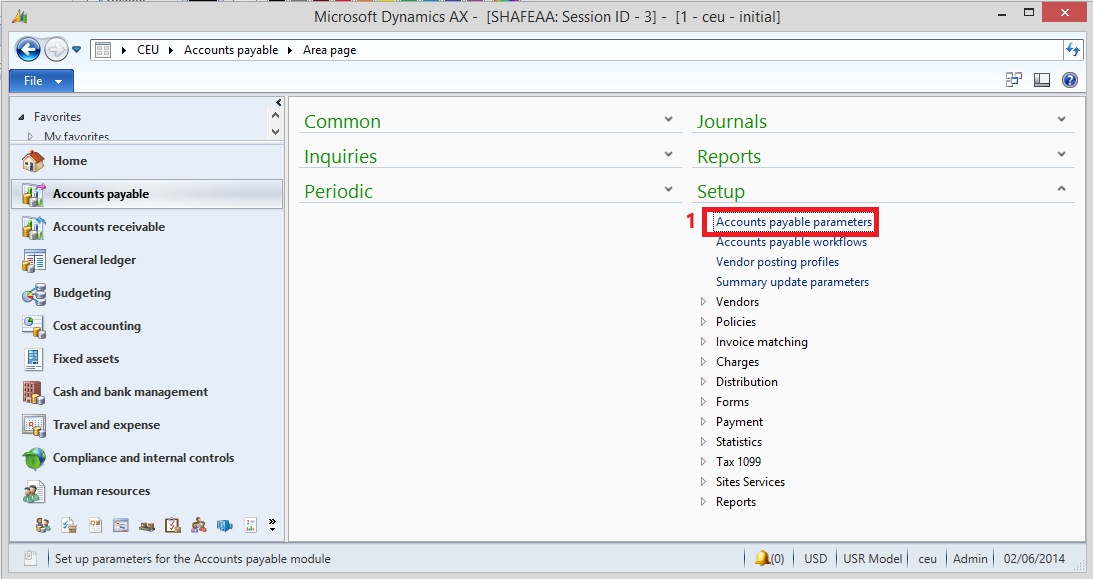
    • Setup Account Payable parameters to use prepayment posting profile 
  1. Click Accounts Payable > Setup > Accounts Payable parameters.


  2. Click Ledger and sales tax from the left pane then open the prepayment journal voucher Section .


  3. If sales tax is calculated and posted when you post a prepayment journal voucher, select the Sales tax on prepayment journal voucher check box. 


  4. In the Posting profile with prepayment journal voucher field, select a posting profile to indicate the accounts to which the prepayment journal voucher and sales tax prepayment journal vouchers are posted. (Select the Posting profile was created in the previous setup)
  5. Press the Close Button


Implementation:                                                                      
  • Create a prepayment journal voucher
  1. Click Accounts Payable > Journals > Payments > Payment journal.  
      
  2. Create a journal.
      

  3. On the Setup tab, select the Amounts include sales tax check box if you want to post the prepayment journal voucher together with sales tax amounts.

  4. Click Lines, and then create the payment line.

  5. On the Payment tab, select the Prepayment journal voucher check box. The posting profile changes automatically to the posting profile for the prepayment journal voucher.

  6. Post the prepayment journal voucher.

  • Settle Customer invoice with the prepayment.
  1. Click Accounts PayableCommon Vendor Invoices Open Vendor Invoices.


  2. Select Invoice and Click the Settle Open Invoice Button.
  3. In the Settle open transactions form, settle the invoice with the prepayment journal voucher

Number groups (form) [AX 2012]

Number groups (form) [AX 2012]

Applies To: Microsoft Dynamics AX 2012 R3, Microsoft Dynamics AX 2012 R2, Microsoft Dynamics AX 2012 Feature Pack, Microsoft Dynamics AX 2012
Click Inventory management > Setup > Dimensions > Number groups.
Use this form to create groups that can be used to automatically allocate batch numbers and serial numbers.

Using number groups together with items

Associate the number groups with items by using the Batch number group or Serial number group field on the Manage inventory FastTab in the Released product detailsform.
Using number groups makes it easier to trace items in inventory transactions. The tracing functionality is especially important for items that represent a certain risk, such as medicine or chemicals, where errors in production could lead to a recall of the items. It is equally important to be able to trace items that have a guarantee back to the date when the items were sold.

Navigating the form

The following tables provide descriptions for the controls in this form.

Tabs

Tab
Description
General
Define how and when automatic number allocation occurs for each number group.
Activation
Select which areas of the system use automatic number allocation. For example, select Purchase activation to automatically allocate numbers in Accounts payable.

Fields

Field
Description
Number group
Enter a unique identifier for the number group.
Name
Enter a name for the group.
Date
Select this check box to include delivery dates when batch numbers and serial numbers are automatically generated by the system and assigned.
The date comes at the start of the number and uses the YYMMDD format.
Example
Locating inventory receipts to cover a sales order is performed in dimension order. For items that are associated with a tracking dimension group where the batch number dimension is active, orders are processed by batch number. A problem occurs when a purchase order is created for a receipt on May 20 and in batch number 345. A new purchase order is created for a receipt on May 10 and in batch number 346. If a sales order is received for delivery on May 15, the problem occurs when the purchase order is automatically picked for May 20, which is the lowest batch number, and the sales order is delayed. However, when the delivery date is included in the batch number that is automatically generated, the batch numbers are 000520-345 and 000510-346. The auto-reservation then picks the purchase order for May 10.
Reference No.
Select this check box to include the reference number, such as the purchase or production number, in the number.
Lot ID
Select this check box to include the inventory lot number in the number.
Number sequence No.
Select this check box to include the number from the number sequence that is specified in the Number sequence code field as part of the number series.
Number sequence code
Select the number sequence to use to allocate lots or serial numbers.
Manual
Select this check box to manually allocate batch numbers or serial numbers.
Only for inventory transactions
Select this check box to update only the number for transactions in inventory processes. This allows for multiple numbers for each purchase, production, and so on.
On physical update
Select this check box if you do not want the number to be assigned until inventory is updated on a packing slip and reported as finished. You can select this check box only if the Only for inventory transactions check box is also selected.
Per qty.
Specify the receipt quantity for each number. This quantity is typically 1 if a serial or lot number group is involved, and is typically the size of the batch when a batch number group is involved.
Order activation
Select this check box to enable automatic number allocation in Accounts receivable. For credit notes, new numbers are generated when items are returned.
Purchase activation
Select this check box to enable automatic number allocation in Accounts payable.
Inventory activation
Select this check box to enable automatic number allocation in Inventory management.
Production activation
Select this check box to enable automatic number allocation in Production control.
Kanban activation
Select this check box to enable automatic number allocation for lean manufacturing.
Source : https://technet.microsoft.com/en-us/library/aa591648.aspx

Configure and use one-time supplier functionality in Dynamics AX

One-time Supplies is common practice in trade business. one time supplier is a vendor who supply items or service for one time.
Dynamics AX help organization to separate the regular vendors accounts form the one time vendors.
in the following steps we will illustrate how to Configure and use one-time supplier functionality in Dynamics AX 2012. 
1- Go to Accounts Payable --> Setup --> Accounts payable parameters.

2- in the Account Payable Parameters select the Number sequences tab then set the number sequence for one-time supplier. This sequence number will be used to generate automatic account number for the one time supplier during the purchase order creation.

3- Select the General Tab then select the "one-time vendor account" this account Information is automatically copied when you create a one-time vendor account.

4- Now we are ready to use the one-time suppliers. Go to Accounts payable --> Purchase Orders.

5- Create New Purchase Order.

6- Select One-time supplier checkbox, enter the supplier Name. Note that the system automatically generate the vendor account by using the number sequence that we assign in step 2. Complete the purchase  order as usual.

7- if we check the all vendors list we will notes that the one-time supplier have been created.

8- and all the vendor account information that we specified in step 3 has been copied to the new supplier except the account number and account name.


Thursday, May 21, 2015

How to Make a USB Bootable

1
Open the Command Prompt. You will need to run Command Prompt as an Administrator. Right-click on it and select Run as Administrator. You may need to enter the Administrator password.
  • This method will create a USB drive that is bootable. You can then copy the contents of an operating installation disc onto the drive to create a portable installation drive.
  • This method only works in Windows Vista, 7, and 8
    2
    Open the disk management utility. This can be opened by entering the command disk part.
  • 3
    Display the connected disks. Type the command list disk to show a list of all the drives connected to your computer. Your USB drive should be listed here as well. Make note of the number next to your USB drive.
  • 4
    Select the USB drive. Enter the command select disk #, replace “#” with the number from the previous step.
  • 5
    Clean the flash drive. Enter the command clean to have the disk management utility verify the integrity of the USB drive, and erase all data.
  • 6
    Create a bootable partition. Once the USB drive is clean, type in create partition primary. You will see a message saying that the operation was successful.
  • 7
    Select the new partition. Enter the command select partition 1 and press Enter. Once you receive a confirmation message, type active and press Enter. This will activate the partition.
  • 8
    Format the USB drive. Input the command format fs=fat32. When you press Enter, the program will work for a few minutes (if it is a small USB, e.g. 32Gb could actually take hours to SLOW format), and the progress will be displayed as a percentage.
  • 9
    Assign the USB a drive letter. Enter the command assign to give the thumb drive a letter designation. Type exit to end the disk management program.
  • 10
    Copy the operating system. Once the USB drive has been made bootable, you can copy over the installation files for the operating system you want to install. You can do this by dragging and dropping using your preferred file manager/explorer.
    • Copy over any drivers you might need during the operating system installation to make the process much smoother.

Wednesday, May 20, 2015

In document management check all file types and for each sales order all documents have to be attached and its mandatory.

Hi,
 Kindly Go to Docuref Table, in the method called filestatus,
Paste this code and check:
Public boolean filestatus(salesTable    _salesTable)
{
    boolean         fileattached = false;
    boolean         repeat;
    Docuref         DocurefTableloc;
    DocuTypeId      type1,type2,type3;
    str             _null;
    Container       con;
    ;
    _null   = "";
    con     = conins(con,1,_null);
    con     = conins(con,2,_null);
    con     = conins(con,3,_null);
    // Collecting and storing the Document Types in the Container
    while select DocurefTableloc where DocurefTableloc.RefCompanyId == _salesTable.dataAreaId
                                    && DocurefTableloc.RefRecId     == _salesTable.RecId
    {
        if(conpeek(con,1)== "")
        {
            con = conins(con,1,DocurefTableloc.TypeId);
        }
        else if(conpeek(con,2)== "")
        {
            con = conins(con,2,DocurefTableloc.TypeId);
        }
        else if(conpeek(con,3)== "")
        {
            con = conins(con,3,DocurefTableloc.TypeId);
        }
     }
     type1 = conpeek(con,1);
     type2 = conpeek(con,2);
    // Comparing the Values to check whether both Document types are of same type
    
        if(type1 == type2)
        {
            return  fileattached;
        }
     type3 = conpeek(con,3);
        if((type2 == type3)||(type1 == type3))
        {
            return  fileattached;
        }
    // Mandatory Document types to be attached
    
    if((type1 || type2 || type3 == "File")&&
       (type1 || type2 || type3 == "Image")&&
       (type1 || type2 || type3 == "Inbox"))
    {
        fileattached = true;
        return  fileattached;
    }
    return  fileattached;
}

Validation to check document is attached to sales order if not picking list should be disabled

Hi,
Try and excecute the following steps to get the desired result,
Step 1:- Go to Docuref Table, create a new method called filestatus,
Public boolean filestatus(salesTable    _salesTable)
{
    boolean         fileattached = false;
    Docuref         DocurefTableloc;
    ;
    select DocurefTableloc where DocurefTableloc.RefCompanyId == _salesTable.dataAreaId
                              && DocurefTableloc.RefRecId     == _salesTable.RecId;
    if(DocurefTableloc)
    {
        fileattached = true;
        return  fileattached;
    }
    return  fileattached;
}
Step 2:-
NOw go to Classes --> Salestable form --> enableUpdateJournalButtons method
in declaration part -- > boolean             filestatus;
after declaration, paste this code,
filestatus      = docuref.filestatus(salesTable) // to check whether File is attached or not.
Below that u ll find the ------ > if (_buttonUpdatePickingList) this statement,
Just override the statement with this code,
if (_buttonUpdatePickingList)
    {
         if(filestatus == true)
         {
            _buttonUpdatePickingList.enabled(enablePickingListButton);
         }
         if(filestatus == false)
         {
            _buttonUpdatePickingList.enabled(false);
         }
    }
Cheers!!! Work done :-)

Wednesday, May 13, 2015

"CLR Error occurred while invoking the scheduling engine" in AX 2012

If you are facing this type of issue then,
Just go to AX Server Configuration then uncheck "Enable the hot-swapping of assemblies for each development session” being enabled on the server" check box.
Now you can release you production order